Showing posts with label free tutorial. Show all posts

Wednesday, December 10, 2014

How to Make an Infinity Wrap Top

I made this top last night and enjoyed wearing it today. I took a shortcut and raided my stash of thrift store shirts for the back and sleeves, but you could certainly also make this from scratch.

 I have been liking mixing knits with these woven shirts, below is another one where I made a raglan sleeve knit top and cut the front and collar from mens shirts. I will post a better photo of it on my mannequin, so you can see the front details. 

I know a lot of you want the free tutorial for making the infinity wrap sweater as shown at the left. Just click this link, Infinity Wrap Top,  and it will take you to the 2 page PDF file on Google Drive.  

I just wrote up what I did, so you may have to tweak it a bit to fit you. 

If you share on Pinterest or anywhere, please share this page and not the direct link to the file. Someday, when I have help, I may choose to publish this in pattern form with sizes and everything. You may not use my PDF to write it up yourself or share the instructions in another format, but feel free to make as many tops as you like and even sell them. I love it when I can help another seamstress make money from her handiwork.

Tuesday, March 15, 2011

Free Sewing Tutorial Yoga Mat Carrying Strap

The gym bag pattern should be ready by the end of this week. Meanwhile, warm up with this quick and easy yoga mat carrying strap project.

Materials list:

* 1.5 yards of 1” wide webbing
* 2 scraps of fabric 17” long by 5” wide
* 2 pieces of heavy weight iron-on interfacing 17” by 5” each
* 8” of 2” wide Heavy Duty Velcro


Step one- Fuse the interfacing to the wrong side of the fabric following manufacturer’s instructions. (I used pre-washed cotton duck which is already a heavy fabric, so I skipped this step.)

Step two-

a. With right sides together, fold fabric in
half the long way, as shown right.
b. Mark 2 dots, each 1” from either side of
center of the fabric as indicated.
c. Using a 3/8” seam allowance,
stitch the raw edges together,
leaving a 2” opening between the dots.
d. Do this for both pieces.

Step three – Clip corners (as shown top right of photo,) turn the fabrics right sides out and press, pressing the seam allowance under in the open area.


Step four-With openings facing one another, pin the following items in place as shown below:
a. 4” of female (the softer side) Velcro at one end of each piece.
b. 3” of male Velcro on the opposite end and flip side of each piece.
c. Strap ends inserted in the openings (not twisted.)


Step five – Stitch everything in place and stitch openings closed. I used contrasting thread so you can see some different ways to do it.


To Use – Just wrap the fabric around the ends of the rolled up mat, secure with Velcro, and carry.
©2011 StudioCherie
Feel free to stitch and sell, just mention this StudioCherie tutorial

Friday, December 31, 2010

Sweetheart Valentine Banner Tutorial

There is a very exciting announcement and preview at the end of this post, so scroll to skip to that if you don't want to read the step by step. I think this Sweetheart Valentine Banner is simple enough for you to duplicate without illustrations on the step by step tutorial that follows. I just ask that you link to this post if you want to share the instructions. Also, if you want to make them for sale, go ahead and give me credit for the idea. If you have never purchased one of my patterns, just know that the instructions here are representative of how I explain things, but my patterns for purchase include pattern pieces and loads of illustrations and extra notes on tools and materials. Here is the how to:
Materials list (makes 112 flags for 16 yards of banner)
2 yards Décor bond interfacing—A heavy weight, fusible interfacing
1/4 yard each Pastel cotton fabrics—I used pink, yellow, green and purple
1&1/8 yard Pink cotton duck fabric
16 yards 1/2” heavy cotton twill tape plus 1/3 yard for every separate banner. If you are making 16 one yard banners, you need 5 & 1/3 more yards of the twill tape for tails. If you are making 2 eight yard banners, you need another 2/3 yard.
3 or 4 sheets of iron-on light T-shirt transfer for ink jet printers
Instructions:
Step 1:
Print backwards words onto the transfer paper. If you want to make your own sheet of words, either make the sheet backwards, and print normally as I have done, or make the sheet forward and tell your printer to print a mirror image. The font I used is Arial Rounded MT Bold. The font size varies between 30 and 36. These need to dry for at least 1/2 hour before you use them. Make the words red.
Step 2:
While the transfer paper is drying, make your paper heart pattern pieces. To make your own heart pattern, mark a 3” square in the corner of a sheet of paper. Fold the paper in half, then in thirds, keeping the 3” square visible. Fold the 3” square in half and cut 1/2 of a heart on the fold through all layers. Take up as much of the 3” square as you can with the heart. When you open this up, you will have 6 identical 3” heart pattern pieces.
Step 3:
Following manufacturers instructions, adhere décor bond interfacing to the pastel fabrics to make them stiff. This makes cutting the heart shapes much easier.
Step 4:
Pin heart pattern onto pastel fabrics and cut out heart shapes. I layer the fabrics and cut through 2 fabrics at a time.
Step 5:
Following manufacturers instructions, iron the words onto the hearts. If you ever wanted an excuse to buy one of those mini irons, here it is.
Step 6:
Cut the light pink duck fabric into rectangular background flags. The size of the flag is 4.12” wide by 4.5” long.
Step 7:
Stitch each heart onto a background flag. Use thread that matches the background fabric or the hearts. Use either a small zig-zag stitch or a blanket stitch.
Step 8:
Stitch flags onto the twill tape. Leave a 6” tail on either end and leave 1.25” between each flag. This will produce banners that have 7 flags per yard. These flags are fun to make and customize for different people and occasions.

Here is the exciting announcement part: As I was making these Sweetheart Valentine Banners, I was wishing I had a pre-printed fabric with the hearts and words. I could do away with the need for a pattern piece. I could do away with the tedium of cutting out and transferring words onto the hearts. Hummm. So, after telling several people including my husband that I was not really interested in designing fabric...I designed my first fabric. I ordered a yard of it last night. As soon as I see it in person and verify that it is just what I wanted, I will make it available for order. This is a preview of what you would see on a fat quarter of fabric. The full yard has 125 hearts with 25 different phrases and the 5 basic colors you see here. It will be $18 per yard at Spoonflower, which is pretty cool since a yard of fabric will make 17+ yards of banner.


Thursday, October 7, 2010

Inspired by Hoodwinked


Inspired by Hoodwinked
Originally uploaded by studiocherie
For those of you who have not seen the movie, I will tell you Hoodwinked is the Red Riding Hood Story told from everyone's perspective - plus some twists. As I watched it with my daughter recently, I suggested Red's costume for Gabrielle this year. She enthusiastically agreed. An hour later, including the trip to the fabric store for a yard of red broadcloth, she was skipping around in this cape. My free tutorial showing how I made it will be posted today at the SewMamaSew Blog. If you sew, you will love that blog.

Tuesday, July 21, 2009

Video Tutorial


My first how to video. Making your own reusable vinyl packaging for a set of A2 size greeting cards. This is a really simple project, and I hope that comes through in the video. I guess I am not a natural because it took 4 takes to get this. I would love to read your comments. I do plan on doing more of these, and I promise they will get better. I have 2 words for myself next time: tripod and hair stylist.

Tuesday, December 23, 2008

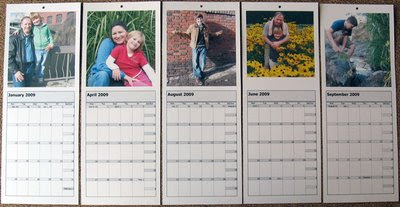
Last Minute DIY Gift - Family Calendar - Free Tutorial


This one will hang in Rory's office, so it's full of his favorite photos of our family taken throughout the year. I fell in love with this size (4.25" x 11") while browsing Etsy for cool calendars. The one I made for my mom has mostly photos of the kids with some pretty floral shots interspersed.


Here is what you need:
  • 7 sheets of letter size 110# card stock


  • 13 digital photos


  • microsoft outlook or another program that has blank calendars


  • printer


  • hole punch


  • 10" piece of ribbon or string

    The calendars on outlook 2000 are geared for the work week, so the weekends are small (Saturday and Sunday smooshed into one box.) Since this one will only be used in his office during the week, that worked out fine. The XP version of Outlook will give you a full 7 day calendar, and the instructions are the same. First, set up outlook as follows:

Outlook>Calendar>File>PageSetUp>MonthlyStyle>


Format Tab>Options>Layout=1page/month and check the "print exactly one month per page" box Fonts=24pt headings and Shading Box is checked

Paper Tab>Type=Custom; Dimensions=4.25"wide and 11"tall; Margins=Top:5", Bottom:.25", Left:.25",Right:.25"; Page size= custom 4.25" x 11"; Orientation=Portrait

Then, Set up your printer for normal, portrait, 8.5 x 11" paper

The way to navigate from month to month on outlook 2000 is View>Go to>Go to Date>click on the arrow next to the highlighted date, the monthly calendar will pop up and click on the 1st of the next month, then click ok.

Navigation on Outlook 2007 is Go>Go to Date> and the same as above from there.

Print one monthly calendar on each side (front and back) of the paper, offset from one another, so you can cut them apart later, after you have added the photos.

After printing all of the months, you can use WORD to print your photos. Set your page margins in WORD as follows: Top=.5" Left=.25" Right=4.5" and Bottom=6.25", then use "insert" to insert your photo onto the page and print onto the appropriate month.

Finish by cutting the pages in half, punching holes at the top center of each, running ribbon or string through the holes, and tying a knot.


Jan DiCintio, over at ScoutieGirl, made her own calendars too. Hers are covered with her sketches for fabric designs, printed professionally in black on white, and would be so much fun to color!

And if you don't need it personalized, but you want a professional looking calendar that you can print yourself and give, check out this shop I just found on Etsy - BlueTricycle - some great choices there.