Post by Gloria Erickson.
Monday, December 29, 2014
Wednesday, December 10, 2014
How to Make an Infinity Wrap Top

I have been liking mixing knits with these woven shirts, below is another one where I made a raglan sleeve knit top and cut the front and collar from mens shirts. I will post a better photo of it on my mannequin, so you can see the front details.
I know a lot of you want the free tutorial for making the infinity wrap sweater as shown at the left. Just click this link, Infinity Wrap Top, and it will take you to the 2 page PDF file on Google Drive.
I just wrote up what I did, so you may have to tweak it a bit to fit you.
If you share on Pinterest or anywhere, please share this page and not the direct link to the file. Someday, when I have help, I may choose to publish this in pattern form with sizes and everything. You may not use my PDF to write it up yourself or share the instructions in another format, but feel free to make as many tops as you like and even sell them. I love it when I can help another seamstress make money from her handiwork.

Tuesday, December 9, 2014
Overnight Bag User Feedback
Recent feedback on the departure satchel. The first one is from a gal who ordered the bag from me and uses it everyday.


Monday, December 8, 2014
Office Chair Slip Covering Made Easy

You can see my apron from Simplicity 1241 in the background, I love it in the Moonshine fabric by Tula Pink.
Wednesday, December 3, 2014
Merry Christmas to Me
I got this awesome deal AND another $70 off by applying for the Amazon credit card. Sweet! Look forward to seeing amazing photos from me with my new telephoto lens like these I found on Flickr.


I wanted to share because it's an amazing deal and some of you might be looking at cameras for Christmas. I love Amazon!
Some of the links in the post above are “affiliate links.” This means if you click on the link and purchase the item, I will receive an affiliate commission. Regardless, I only recommend products or services I use personally and believe will add value to my readers. I am disclosing this in accordance with the Federal Trade Commission’s 16 CFR, Part 255: “Guides Concerning the Use of Endorsements and Testimonials in Advertising.”Wednesday, October 29, 2014
Online Quilt Festival Large Quilts

I love the idea behind AmysCreativeSide Bloggers Quilt Festival. There are so many beautiful quilts posted there. I hope you will check them out. This quilt started as a drawing for me, a doodle really. Let me see if I can find a picture of it.

That is a page of my doodles. I kept coming back to this woven looking design and liking that is wasn't all uniform. I bought myself The EQ program to see if it could help me turn my drawing into a quilt. It didn't. I ended up writing the pattern by hand. My little 3" x 3" sketch became a 87" x 74" quilt. I also made 2 other quilts in the process of documenting the pattern. I think it is a great one to make something more manly, but the girly version makes me happy on the wall at the head of my bed.


Check out all of the cool quilts and click through to meet their makers.

Tuesday, October 28, 2014
Sewing Contests
You may have heard of Pattern Review. It is a great site for anyone who sews garments. If you are wondering how a certain pattern will look on you, chances are that some one with your body type has already made the garment and posted photos and a pattern review. Sounds handy right? They are always running contests too. If you like to sew, check it out. You might win something!

Monday, October 27, 2014
Shine at the Bloggers Quilt Festival

Looking for a video for you in case you don't know what paper piecing is, I realized that I am a freak. All of the videos I found show making a quilt block with no batting, just the paper foundation and the fabric. I like the way I did it, especially for this little banner. If I didn't already have the batting built-in to it, the gem would probably be a UFO right now.
For lots of fun quilt projects and getting to know the quilters behind them, I recommend you check out the Blogger's Quilt Festival happening right now. There is even a few more days for you to enter your own quilt.
Monday, October 13, 2014
New Simplicity Patterns

 Girls are going to love the mommy and me and doll matching apron sets you can make with Simplicity 1241. The shirt collar aprons are my favorite and the Peter Pan collar is cute as can be. The jewel neck collar apron is also great for showing off your fun fabrics.
Saturday, September 20, 2014
Pie Crust Perfection
I believe that being confident is the beginning of creativity. Once you have mastered the basics of a thing, you can spin-off with good results. I took one of the pie making classes at Craftsy. I did make a great apple pie that I did not photograph. And I made what you see here, cinnamon sausage and homemade hot pockets. Thanks to Evan Kleiman's great teaching, I can make fabulous, flakey, tender pie crusts. We are still having hot weather, but as soon as it turns cold, I will be diving into the soups class too. It's fun to learn new skills at Craftsy. All classes are on sale this week end too!

Tuesday, September 9, 2014
As Thanksgiving Approaches

I think more about food in the Fall and Winter. As a family we gather with friends more around food at the Holidays. I just took a look over at Craftsy to see what was cooking. Oh my goodness! I did not realize how many amazing cooking classes they have going over there. I found several I am going to try to cram in before Christmas - before Thanksgiving if I can. I have copied the class descriptions for you here, and posted my affiliate links for your convienience.
I am going to have to do this one, Love Your Vegetables, first. Read the description and you will see why:
Transform nutritious vegetables into crave-worthy meals your family will love with essential techniques for cooking seasonal vegetables year-round. Cooking Light executive chef Anna Bullett will share her expert tips for cutting and roasting winter squash with ease, incorporating hearty greens such as kale into mouthwatering pastas and even caramelizing Brussels sprouts and pairing them with crispy pancetta for a dish that will please your pickiest eater. Enjoy more than 20 recipes included with this class, from a tomato ricotta tart to grilled eggplant sandwiches with creamy aioli. Plus, get a bonus lesson on refrigerator pickling and preserve your favorite vegetables at the peak of their season.
I will use this one a lot: Building Flavorful Soups. Transform everyday ingredients into an endless variety of soups to please every palate! Learn secrets for developing flavor from James Beard Award-winner Peter Berley, and discover recipes for more than twenty soups and broths --plus an array of creative garnishes! Quickly make small-batch broths instead of spending hours simmering, and learn to use chicken, ham and pork to create hearty, homey favorites. Roast vegetables for maximum flavor, then purée for creamy, silky-smooth soups. Delve into the flavors of the sea to make briny broths from roasted shrimp shells and clams, and explore exotic ingredients like kelp and wakame to build savory umami flavor. You’ll even learn how to create your favorite miso soup and four Japanese dashis!
My mom makes the most amazing pie crusts, but she lives 300 miles away. It's about time a grew up and made pies for my own family.
There is so much more. I will get started with these though, and let you know how it goes.
Monday, September 8, 2014
More new patterns since my last post
If you follow me other places you already know this, but I felt I should post here too. The skirt pattern is out.


And a new bag. I am calling it the Big Weekend Bag. It is also a great diaper bag and perfect to use with the zippered change pad bag
Back to slipcovers...
.
Win Free Patterns
|
|


Monday, August 4, 2014
The Internet verses The Outernet
The most up-to-date info on what I am doing is now found on my Facebook page. For me, that is the most efficient way to post photos and tiny updates. I think it is the way I am reaching the most people too. So if you don't follow me yet on FB, please do.
If you are reading this, I am sure you struggle with how much time you spend on the internet verses how many things you need to accomplish in the outernet, aka the real world, the physical realm. Actually, the internet is a real world and we need to operate in it. The question is always how to do so without it sucking up the whole day. I do have a smart phone, but I am not glued to it - that helps. Everything is bigger and better on my PC, so when I am in the outerverse, I can talk or text as necessary, but I save any navigation or online interaction including Facebook for when I am on the PC. I am in a minority. I am blown away by the number of people using mobile devices to buy things. When they do this, they are not reading descriptions. Sometimes they don't even know what they bought. As an online retailer, I have to try to cram all of my pertinent info into a single photo to capture that audience - like, yeah. About 1/2 of my Etsy business is done on mobile devices. If you have an Etsy shop, now is the time to optimize for mobile. I uploaded a video to Facebook that is optimized for mobile devices, so this is one to watch from your tablet or phone. I am talking about and showing my different travel bags.
Blogs are still bomdiggity for building an audience in the sewing world, but I wonder how Facebook is catching up to that for other seamsters out there. I may have to interview someone.
For those of you who don't Facebook, here is the lowdown on my recent releases and upcoming works:
New pattern - Cathedral Style Table Runner (instructions also given for turning it into a quilt) This is an update and slight improvement on the technique I used to make the cathedral style tote back in 2010. It is a fun and quick project that I think will put you in a holiday decorating mood.
New in the Simplicity catalog - #1335 chairs pattern.
 I have testers working on my first garment pattern release, so we are getting close on that. It's a fun and easy skirt that I think everyone will love.
The Simplicity Fall catalog will have 2 new patterns from me in it. Mother, daughter, doll aprons. And casserole carriers. I will show pattern covers for those when I get them.
The Spring Simplicity catalog will have a diaper pattern pack from me. I will put the bag out in PDF format too.
I have a wingback chair to cover so I can better help all of my Craftsy class people who are doing wingbacks. Photos will pop up over on my Facebook page as I get to that.
Of course my son's birthday is this month, so I better get his backpack made and write that pattern too. LOL, that is so 3 years ago so I better finally do it this year. He wore this one out, so I have heavy duty cordura for this years version.
 I updated the duffle pattern again, so if you are on Craftsy, you will get a notice. If you have already made the bag, you obviously do not need the new pattern. The bag is the same. I just made the instructions a little better for those who have not yet sewn it. There are 2 parts explained differently, the strap is now done the way I did it for the trolley duffle pattern sewing it into a loop before you attach it to the bag. And the pleated pocket is explained a lot better. I hardly ever got questions about it, but I thought it needed improving so I did it. The bag will still come out the same.
Back to the outernet and bye for now.
If you are reading this, I am sure you struggle with how much time you spend on the internet verses how many things you need to accomplish in the outernet, aka the real world, the physical realm. Actually, the internet is a real world and we need to operate in it. The question is always how to do so without it sucking up the whole day. I do have a smart phone, but I am not glued to it - that helps. Everything is bigger and better on my PC, so when I am in the outerverse, I can talk or text as necessary, but I save any navigation or online interaction including Facebook for when I am on the PC. I am in a minority. I am blown away by the number of people using mobile devices to buy things. When they do this, they are not reading descriptions. Sometimes they don't even know what they bought. As an online retailer, I have to try to cram all of my pertinent info into a single photo to capture that audience - like, yeah. About 1/2 of my Etsy business is done on mobile devices. If you have an Etsy shop, now is the time to optimize for mobile. I uploaded a video to Facebook that is optimized for mobile devices, so this is one to watch from your tablet or phone. I am talking about and showing my different travel bags.
Blogs are still bomdiggity for building an audience in the sewing world, but I wonder how Facebook is catching up to that for other seamsters out there. I may have to interview someone.
For those of you who don't Facebook, here is the lowdown on my recent releases and upcoming works:
New pattern - Cathedral Style Table Runner (instructions also given for turning it into a quilt) This is an update and slight improvement on the technique I used to make the cathedral style tote back in 2010. It is a fun and quick project that I think will put you in a holiday decorating mood.
New in the Simplicity catalog - #1335 chairs pattern.
The Simplicity Fall catalog will have 2 new patterns from me in it. Mother, daughter, doll aprons. And casserole carriers. I will show pattern covers for those when I get them.
The Spring Simplicity catalog will have a diaper pattern pack from me. I will put the bag out in PDF format too.
I have a wingback chair to cover so I can better help all of my Craftsy class people who are doing wingbacks. Photos will pop up over on my Facebook page as I get to that.
Of course my son's birthday is this month, so I better get his backpack made and write that pattern too. LOL, that is so 3 years ago so I better finally do it this year. He wore this one out, so I have heavy duty cordura for this years version.
Back to the outernet and bye for now.
Sunday, June 29, 2014
Sometimes I just have to play
I spent some time with Stefanie at Charming Lulu a few days ago. I was there to buy one of those cool mechanical chalk pencils with all of the colors for Alice. (affiliate link) As we talked I shared with her some of my ideas for fabrics, and she got a big smile on her face. Showing me one of the big fabric companies catalogs, we agreed great minds think alike. When I put my houndstooth quilt pattern out 4 years ago, I was wishing for more houndstooth fabric - It is coming, big time. Still no one is imagining it as sparkly as Kim at Persimmon Dreams made hers from my pattern with a rainbow of hand dyed fabrics. My dream incorporates prints too. I just wanted to put this out there now, today The 29th of June 2014. It is my idea to put ditsy prints in a houndstooth. I am not going to patent it or anything, but if a fabric company wanted to talk, I am here.
This shows the new scale for the pillow top quilt compared to the original from 2010. Also, if you already have the houndstooth quilt pattern from me, I will get an email list together and contact you all to share a slightly easier way to cut it that has no waste, as well as the new sizes to use if you want the pillow top size. The ditsy fabric I used here is from Jeni Baker's new line called Dreamin Vintage. It has a Liberty of London feel to it and Art Gallery Fabrics are so soft, you will become addicted to them.
Saturday, June 28, 2014
My Favorite Quilt

- Tell us about your favorite quilt. When did you make it? What pattern did you use? What fabrics?
I made the first version in January and this quilt was completed in March 2014.
This is original to me, I am still writing the pattern
The black is Kona, the other 3 are all from Parson Gray: the rust is from World Tour, Mantova in Cloak; the stripe is from Vagabond, Camel Blanket - Scirocco; and the green is from Curious Nature, Dimitry Vines in Pine.
- Have your shown it at any quilt shows or entered it in any contests?
No, I never thought of it. - What memories or people does the quilt make you think of?
I made this for my 15 year old son. When I see this quilt, I think of him. - What do you like best about the quilt?
I love the high contrast of the fabrics and the movement I created. - How did you grow as a quilter while making it?
This started out as a doodle. When I sat down to draw with my daughter over Christmas break, versions of this pattern appeared in all of my drawings. Turning it from a drawing to a quilt was challenging and rewarding. I grew in my confidence about following my creative process. - If you could make this quilt again, what (if anything) would you do differently?
Ha ha. I have made it 3 times. This one is the second. The only thing I would change is the fabrics to come up with another great combo. - Where is the quilt now?
It is in my studio while I write the pattern. My son has been asking for it...better get back to work!
Sunday, June 22, 2014
My favorite tools, part 1

Saturday, June 21, 2014
Cutting out piping before slip covering
This little tutorial is the answer a great question I received this morning in my Craftsy Class. The question is
the arm chairs I want to slipcover have existing piping. How do I handle that?
My answer is that you cut it out. I have a chair I want to slip cover, so I will show you on it.
Step one: Clip as close as you can to the attachment point of the piping on both ends of a length of piping. You can pull that length of piping out from one of the ends.
the arm chairs I want to slipcover have existing piping. How do I handle that?
My answer is that you cut it out. I have a chair I want to slip cover, so I will show you on it.
 |
Step one: Clip as close as you can to the attachment point of the piping on both ends of a length of piping. You can pull that length of piping out from one of the ends.
 |
| If you know you will be cutting the fabric away, you can make a slit at an easier place to pull from. You will still need those clips at the ends to free the piping. |
 |
| Step 2: Pull out the piping. |
 |
| Step 3: I find that the fabric that went around the piping is almost as bulky as the piping itself, so I like to cut it away completely. Just be careful you do not cut the seam. As you can see, the upholstery is still passable with the piping cut out, so if your chair has to be uncovered for a couple of hours while you wash your new cover, it will look okay. I hope that helps! |
Tuesday, June 10, 2014
Sewing Manifesto - Bust that Stash!

Are you finding it hard to tackle the next project? Are you afraid you might be burned out? Sometimes, when you have completed a big project (or 5) you need a boost to get you sewing again. A motivator. A mantra. Words to magically make sense of your mounds of fabric. A reminder of how much and why you love sewing. Start brainstorming. I am talking about building a personal sewing manifesto. Jot down the ideas that inspire you, and post them on the wall. I used GIMP to make mine fun (In my studio, if it's not fun, it doesn't get done) with different sizes and fonts. Feel free to print mine and use it, or find what speaks to you, and make your own. A manifesto may be the encouragement you need to reinvigorate your work.
My latest projects include 3 new sewing patterns for Simplicity, watch for them in upcoming catalogs:
Simplicity #1335 A furniture pattern with 8 projects included. Shipping June 13th.
Simplicity #1241 An apron pattern with 3 style options and mother, daughter, doll sizing for each. Shipping October 10th.
Simplicity #1236 A casserole carrier pattern that includes gift baskets and bowl covers. Shipping October 10th.
Simplicity #1241 An apron pattern with 3 style options and mother, daughter, doll sizing for each. Shipping October 10th.
Simplicity #1236 A casserole carrier pattern that includes gift baskets and bowl covers. Shipping October 10th.

And an exciting new Slipcovering Class at Craftsy. The class will be available next week. Enter here for a chance to win the slipcovering class for free. Winner will be announced on the 18th of June.
I hope you will use my sewing manifesto or write your own. If you are looking to bust your stash like I am, check out this amazing quilting class that is available now over at Craftsy.
Thursday, June 5, 2014
Big class sale at Craftsy
You know I love Craftsy classes. This is your chance to give them a try at incredibly low prices.
Craftsy's BIG Summer Sale: Save Up to 50% on ALL Online Classes!
Want to learn a new skill or brush up on an old one? Now is your chance! You can save up to 50% off on ALL online classes at Craftsy's BIG Summer Sale! Cooking, cake decorating, sewing, gardening and so much more... all up to 50% off, with some classes starting at just $9.99! This is a sale not to be missed, so make sure you hurry because it ends at 11:59pm MT on Monday, June 9th.
**This post contains affiliate links and I will be compensated if you make a purchase after clicking on my links
|
Thursday, May 15, 2014
Before and After Computer Nook Makeover

The keyboard tray is from Office Depot. You need about a 33" opening to install it according to the instructions. My opening is 30" Just contact me if you have a similar situation and I can tell you how we made it work. I love it!
The shelves are from Lowes. You need to cut "x's" in the fabric for installing anchors for the shelf brackets. Move the fabric away from the anchor area to keep your drill from catching on a thread and eating the fabric. (I have no experience with that whatsoever - just guessing that might happen...)
The crate that elevates the printer to give me another storage nook is from Michaels. I will paint it to match the shelves (in my dreams.)
The chair slipcover is from my easy pattern you can find on Craftsy.

Don't miss out on Craftsy's Mystery Markdown Flash Sale!
**This post contains affiliate links and I will be compensated if you make a purchase after clicking on my links
Don't miss out on Craftsy's Mystery Markdown Flash Sale! Enjoy big savings on nearly 200 yarns/fabrics and project kits now. Limited supply, shop before it disappears! Hurry, offer expires Friday, May 17 at midnight PST 2014. |
Sunday, May 4, 2014
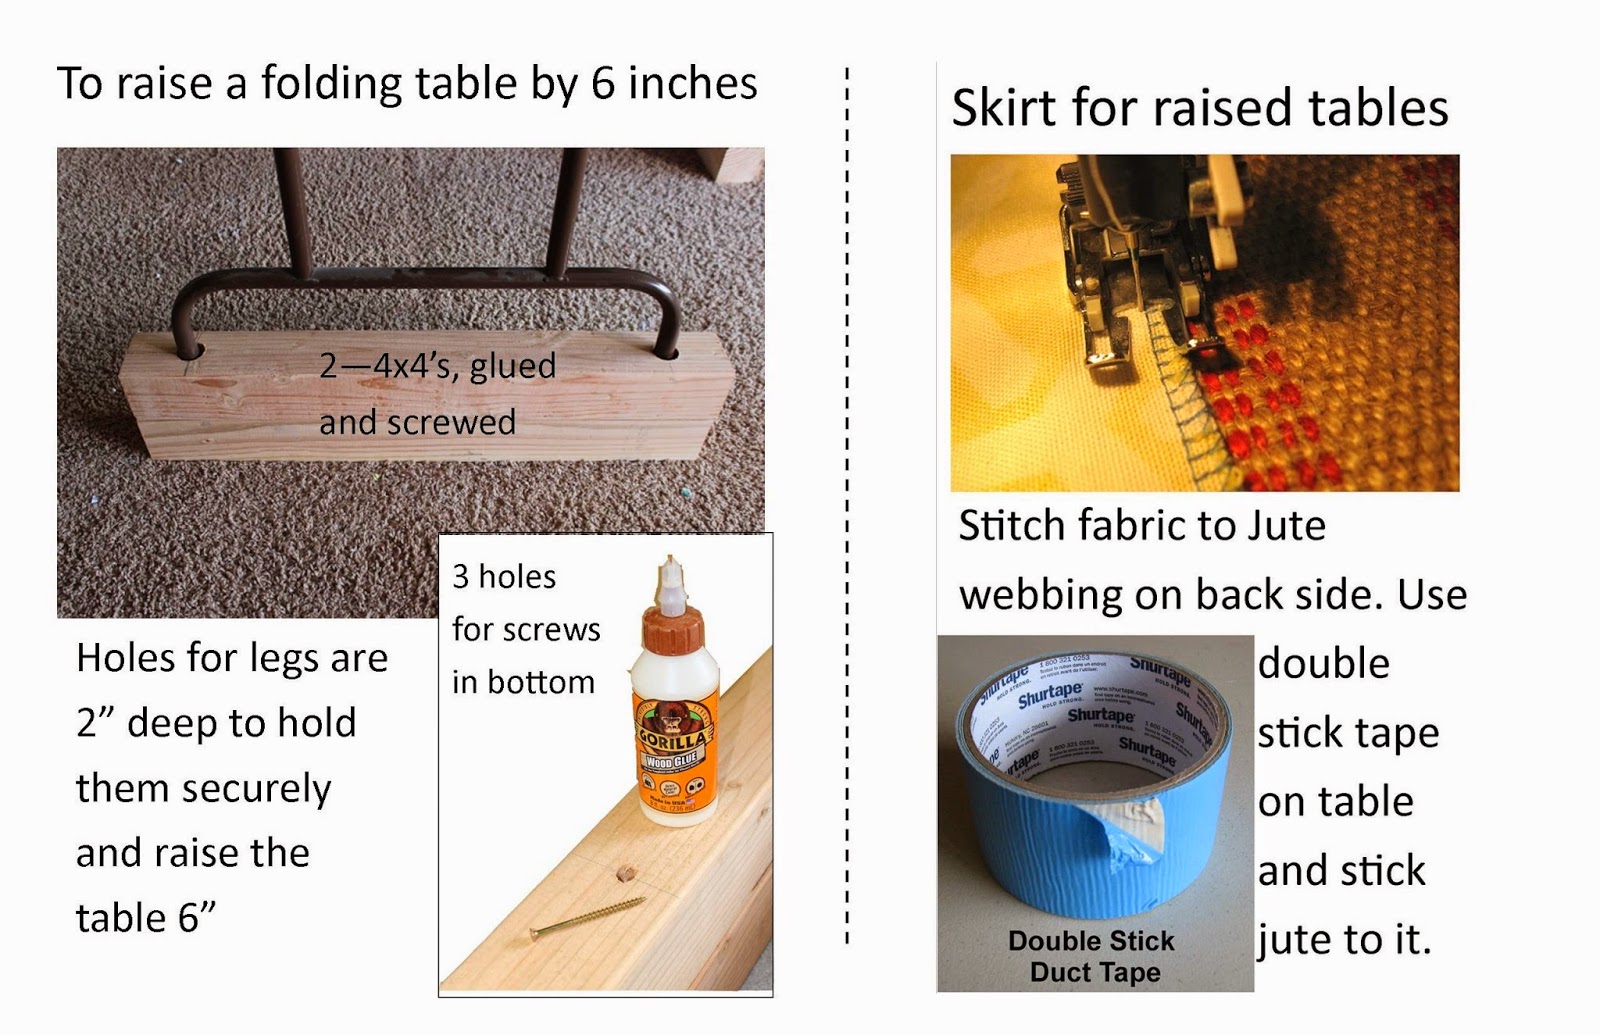
How to Raise Up Tables to Counter Top Height

Raising the folding tables was easier than I thought. Of course, it helps to have a friend with a wood shop. Once they were on their new risers (4x4's glued and screwed together so they were 8 inches tall and holes for the table legs 2 inches deep to hold securely) I could not wait to get skirts on them. The skirts are 34 inch lengths of extra wide fabric - luckily I had enough - you may need about 10 yards of fabric if you are doing 2 tables like I did. On the backside of what you can see, I have stitched the fabric to Jute webbing. I found double stick duct tape at Lowes and stuck that to the tables, then the jute sticks to the tape. I love it! I hope this little how-to helps you upgrade your creative space.
Thursday, April 24, 2014
Sell your own patterns
I have personally encouraged many of you to sell your own ideas as patterns. Craftsy makes it easy. It is worth the time it takes you to figure out how to teach your process because once it's done, you can move on to the next thing. If you knit, crochet, sew, quilt, paper craft, embroider, or make jewelry, you can be a Craftsy designer! You should be making money from your awesome designs and not worrying about someone else copying you. That is what I think.
How to Add & Sell a Pattern on Craftsy
(This post contains affiliate links which means I will be compensated if you purchase after clicking these links.)
(This post contains affiliate links which means I will be compensated if you purchase after clicking these links.)

In addition to wonderful online courses and craft supplies, Craftsy also has an independent online pattern store that lets anyone upload and sell downloadable e-patterns with no fee!
How do you add a pattern to Craftsy and start your pattern store? It’s easy!
1. Make sure you have a Paypal account. All pattern transactions happen through Paypal, and Craftsy requires that you have a Student, Premier, or Business account in order to sell patterns.
2. Put your pattern in .pdf format. You can’t upload any patterns to the online pattern store unless they’re a .pdf file format, so if they’re currently saved as a Word doc, .jpg, or other file format, you must convert it to a .pdf before you upload it to Craftsy.
3. Include a photo. All patterns must have at least one photo to accompany them, but you can add up to five photos. Colorful, interesting photos tend to work the best for catching our members’ eyes!
4. Fill out the pattern description. We will ask you some basic questions around your pattern making it easier for Craftsy folk to find your pattern and know what your pattern is for. Make sure you have info about your pattern handy for this step.
For more information on how to sell a pattern through Craftsy, or to get started, visitCraftsy today!

Tuesday, February 25, 2014
Warp and Weft Quilt
I am excited about getting this out in pattern form. I pinned it to my bedroom wall to take a photo. It motivates me to bind it, so I can hang it properly. The solid is an Amy Butler linen I have had forever. The other 2 are also from Amy Bulter. I love how it brightens the wall behind my king size bed. This quilt is 51" square. I have Alice piecing another one for me in a bed size out of Parson Grey fabrics for my son. He is going to love it.
This was the first project I used to try out my new EQ quilting software. The one drawback is the software does not allow for strip piecing which is how I do this quickly, so I need to write the instructions by hand. Using EQ, I was able to audition fabrics for the quilt without cutting into it, which was great. The program also gives you yardage which is awesome. So far, I am glad I got the program.
Lots more happening right now, but I wanted to pause and share this with you.
Tuesday, February 4, 2014
Using Quilting Cottons on the Departure Satchel
 You know I prefer home decor weight or outdoor fabrics for the departure satchel, but I did recently make one with quilting cotton. I want to help you use your incredible stashes of quilting cotton, so I have made some notes for you here.
1. Plan on having a dry clean only bag. That way, you can use the duck without prewashing it. The finish on the duck is really nice if you don't wash it and I think it gives the bag better shape.
2. The lining of the bag can be made following the original instructions. The only changes are to how to handle the exterior fabric. (and the duck if you use it without washing)

(If you insist on your bag being washable, I do not recommend the iron on interfacing. You will have to find a sew-in interfacing to substitute. You are looking for thin but stiff interfacing. That is what I love about the decor bond.)
4. Add piping at the end of step 3 and at the end of step 6, going all the way around the front and back of the bag. Also, piping at the top of the trolley sleeve is nice.
(I added lining in the front pocket which is really nice, but it would not be necessary if I had used piping on the pocket instead. Next time, piping on the kangaroo pocket. Also, my fabric got too thick at the top front for the piping, which it would not have been had I not lined that pocket and used the piping instead.)This is how I love to travel, with both the duffle and the departure satchel. They look great together too.

Subscribe to:
Posts (Atom)