Showing posts with label pattern review. Show all posts

Friday, March 24, 2017

My Jacket Express and Pattern Review

I know you want this class now if you missed it last week. The Craftsy class includes the physical pattern mailed to you which makes it a great value. Here is an affiliate link that gets you a 25% discount.
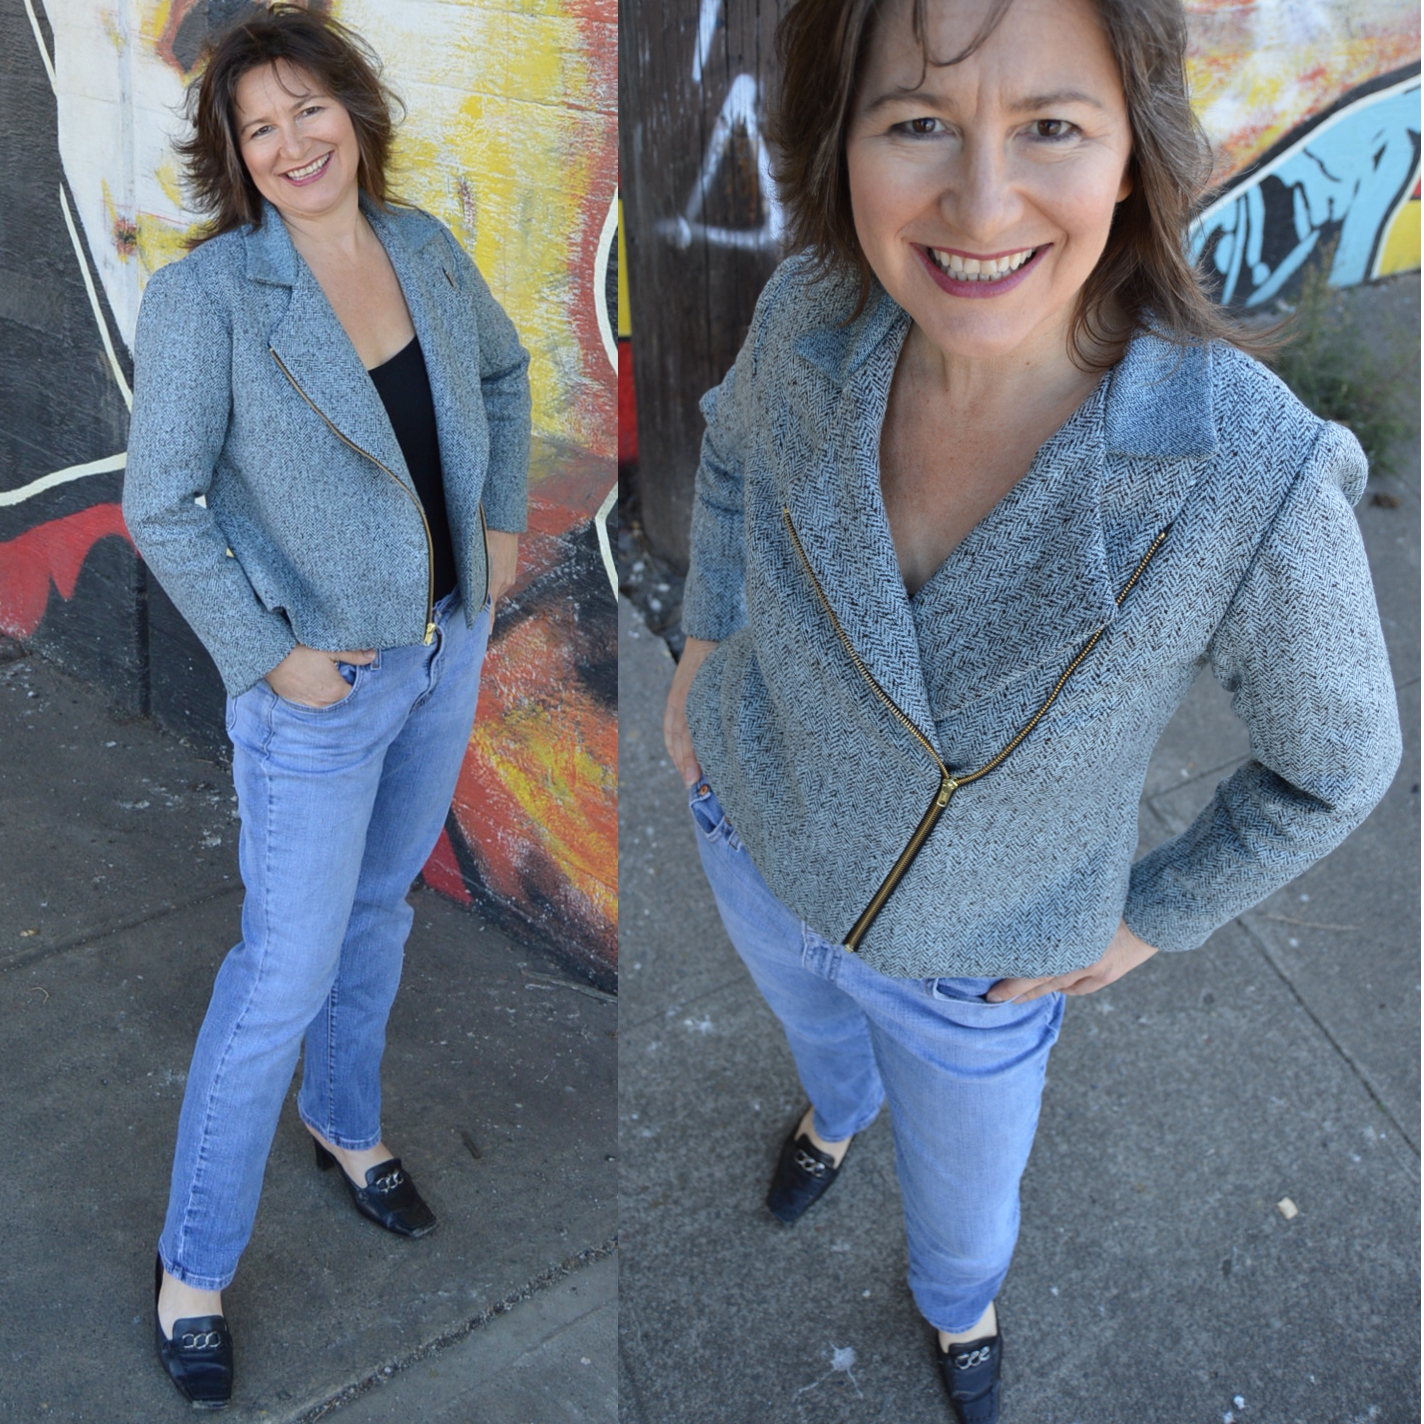
 Being able to sew along with the video classes was wonderful. I could put my brain on cruise control and just follow Janet. I love her teaching style. She is a very sweet and helpful person. I think the pattern is very clever. As you can see, I LOVE that it has 19 pattern pieces - all the better to mix fabrics, my dear.

I used the finished garment measurements to choose a size, and I made the size small. It was supposed to be 43.125" at the bust (and hip) but mine came out about 42" when closed. My snaps are set in .75" from the front edges. The button hole markings are probably a little closer than that which would account for the difference.
I loved learning how to use the pressing tools properly.  I recently purchased the point presser from Janet's website and I used the bottom of it as a clapper. I already had a point turner and a sleeve roll. Janet uses a seam stick instead of a sleeve roll. I am going to have to get that too, it works better than a sleeve roll for pressing seams.  Here is a link to Janet's pressing tools for sale.
Changes I made to the pattern:
1. I needed the breast pockets on the outside for my design - the original pattern has them on the inside and a very clever opening and top stitching. To accomplish my contrasting pockets, I used the pocket pieces as facing pieces but instead of stitching them to the outside and turning in, I stitched to the inside and turned out.  I kept the shape of the pocket opening by making the top edge of the pocket match what the facing would have been, and added muslin pockets behind the facing (fake) pockets.
2. I lengthened the sleeves by an inch and a half. It is a 3 part sleeve so that was a little tricky to get the shape just right after lengthening and I don't think I did a great job of it. I want to revisit the sleeve next time and redraft a sleeve using Suzie Furrer's class.
3. When installing the cuffs, I completely sandwiched the sleeve edges and mostly burrito'ed the sides and ends of cuff, leaving about 3" open to turn. I liked the way this came out better than the way she shows in the class. (I did one her way and one my way)
4. I made the collar pointed instead of curved.
5. I took 2" out of the length of the center back, tapering it out to meet the side seam. The jacket was hitting me right on the bum and it was keeping the jacket from hanging properly. (All that hiking and stair climbing is paying off!)  The hem still looks straight when I am wearing it. This change means you have to change the shape of the back facing piece to match.
6. I used snaps instead of buttons and button holes.  My spacing is different too. I used 5 snaps on the front instead of 4.
Additional changes I will make next time:
1. I will cut the front facing slightly longer than the pattern at the top end where the facing meets the shoulder seam. Having only 1/4" seam allowance is not enough for me, I ended up short on one side. I can always cut it off later if I don't need it.
2. I really do not like the notches at the shoulder and the final closure of the collar. I would like to try leaving the upper collar and under collar unconstructed until the end. Maybe the upper collar could attach to the facing and the under collar attach to the jacket, then they all come together along the outside edges. That might work better for me without the 1/4" deep notches. The other option would be to simply stop and start sewing again at the notches rather than making them long enough to flip out of the way.
3. Sleeve vent I will make and/or finish differently. Maybe take a look at doing a different sleeve. I need to make a whole sleeve at the correct length and then break it into 3 pieces. Adjusting the length of 3 sleeve pieces just did not work. Wearing it's great, but I know it could have been drafted better. The original is great but just not long enough for me.
I hope you'll take advantage of this class and pattern. I think you will love it like I do. Connect with me and show me your jackets. I would love to see them.  I posted some of my process photos on Instagram. I am @StudioCherie_sewing on Instagram. If you follow me there, you will see the TripsterShirts as I make them. I'll be making more of these jackets with the TripsterShirts label. One of my friends commented that it had a '70's vibe. Next photo shoot, I will stick my front leg way out for the "keep on truckin" pose.

Thursday, December 17, 2015

Sewing Bee round 4

This is my rough draft made from polo shirts left behind by my ex. A lot of the sewing gals got a kick out of my "revenge shirt."
This is the one I entered in the contest. Made from thrift store polos because I could not find cool knitted fabrics by the yard.
I just realized I never wrapped up the Sewing Bee here on the blog. I didn't win, but I am happy with what I made. The final challenge was to make something for the Olympics. I made a golf uniform, since golf will be a new sport this year and yoga is not an Olympic sport. Yoga clothes are what I would have most used. It was super fun to sew challenges along with so many talented women from all over the world. I want to do more with Pattern Review this coming year. See the winner, who made a spectacular ensemble, here. The shirt is on my list of patterns I want to write up and release for you. It is a monumental task to grade that many pattern pieces and get it all into PDF format though...

Wednesday, October 7, 2015

Pattern Review Sewing Bee Round 3

My entry to the sewing bee, round 3. This is my pattern review entry. The Moto jacket that Janet Pray teaches in her Craftsy class: Sew Better Sew Faster - Smart Construction. (affiliate link) I am really enthusiastic about the class. Sewing along with it was just like going to a live class and having the designer walk you through their pattern. There were just a couple of times where I didn't understand exactly what she said, but when I looked  at the pattern guide that came with it, I was back on track. I hadn't sewn a lined jacket since high school. Does anyone remember me going to school Junior year in my pastel yellow suit? I love my new jacket. It is perfectly cozy for the chill we are starting to feel about now. My version is a little different from the pattern that comes with the class. If you want to make my version, you can download my collar pattern and the lapel change at Google Drive. My jacket is a size medium, so keep that in mind as you work with the pattern changes, you may have to tweak it a little as you go.


This is the inside view of the jacket, lined in silk. Since the outside is a gorgeous italian wool, I wanted the inside to be equally luxurious.

Sunday, September 20, 2015

Pattern Review Sewing Bee Entry Number 2

I am proud of my self restraint not going crazy all over the fabric like I did with my colorful jacket in the Spring. I hope it is enough to make it through to the next round. You can get an idea of my process in the next couple of photos. I love my new dress. Check out the other entries. The deadline is mid-week I think, so there could be up to 50 entries by then.  There are already some show stopping pieces posted.

Wednesday, September 16, 2015

Pattern Review Sewing Bee Challenge number 2


Last year I didn't get this far because I am not always good at following directions - maybe that is why I write them? Round 1 was making a fitted blouse, you can see my pattern review here. 

 For round 2, we were asked to embellish some fabric and make a garment out of the new textile we create. These are the techniques I have ruled out.
 #1 hand embroidery - I can't even show you a photo of how bad I am at this, but I did poke around at it on Sunday night. 10 days is not enough for me to get good at this, so not going there.  Sorry Natalie Chanin, I love your work and the class of yours I took, but I will have to continue to admire your craft from afar for now.

#2 texturizing:  I have a polka dot fabric that will eventually be used as a muslin. The dots were much bigger than I realized when I chose the fabric online. I could not wear this fabric as it is, so I thought to shrink down the dots by hand stitching around them and gathering. It is a really cool effect, but it would shrink my 2 yards down to 1/2 a yard. It could be a really fun scarf, but I can't enter an accessory in the challenge. It has to be a garment.


#3 ticker tape quilting
I love it, especially the bright sample on the left. Lord knows I have fabric scraps for it. If it were Spring, I would make a skirt out of this for my entry.  So I looked at it in more seasonal colors, but this one one the right is not really photogenic.
I need something graphic for this online competition.


If you are not already following the Pattern Review Sewing Bee, I invite you to check it out and see the wonderful items being made. Pattern review is a great place to learn more about sewing and about specific patterns too.
I think I have decided on my project. I will show it off when I am finished.

Sunday, March 29, 2015

Simplicity 1463 My own private What Not to Wear Episode

This is my muslin. It is always good to have extra fabric if for nothing more than trying out a new pattern. You can see from my notes why I am not modeling this one. I chose Simplicity 1463 because it was listed as one of the top 10 patterns of 2014 by Pattern Review. It appealed to me because it looked cool and comfortable. I am a sucker for raglan sleeves and V-necks are good for me. I also wanted something with at least one part on which I could practice my Alabama Chanin techniques.  I was skeptical about the "V" shaped hem in front and back, but that was easy to cut off. I did try it on with the original hem and it made my thighs appear 3 times larger than actual. In the back, the upward curve of the yoke makes it look like I must be hauling something heavy in front - wearing a baby, maybe. Then I turn around and the front is pretty billowy too, so you think, yes, she is hauling a baby but it's on the inside. Just what every woman wants. I thought I could salvage the pattern with a few design changes. Listed in order of difficulty.
#1 Raise and straighten the hem
#2 Add a zipper in front to open up the front and wear as a layer over a tank top, automatically slimming.
#3 Change the back yoke to point down in center back.
#4 Draft a new lower back to allow some fullness but without the gathers.
#5 Draft elbow length normal sleeves instead of the butterflies.
In the end, the only pattern piece I actually used was the front, and that was changed because I added the center front zipper.
In my next post, I will show you the final version, talk more about the class with Natalie Chanin, and officially review Simplicity 1463.

Monday, December 8, 2014

Office Chair Slip Covering Made Easy

I asked Alice to sew up the chair pattern for me. I wanted someone who had never made an office chair cover to test Simplicity 1335 for me. It came out perfectly - I love it. The fabric is home decor weight cotton from Westminster Fibers, Dream Right by Deena Designs. The only change you need to watch out for in that pattern pack is that they don't teach the proper hem. They say "apply bias tape." It should say, Apply bias tape to fabric edge with right sides together, then fold to wrong side and stitch in place for a narrow, 1/2" hem. Click here if you need to run out and get that office chair, I do highly recommend it. This slip cover will fit it perfectly. If you are covering a similar chair, I would recommend doing a muslin for fitting first.
You can see my apron from Simplicity 1241 in the background, I love it in the Moonshine fabric by Tula Pink.

Tuesday, October 28, 2014

Sewing Contests

You may have heard of Pattern Review. It is a great site for anyone who sews garments. If you are wondering how a certain pattern will look on you, chances are that some one with your body type has already made the garment and posted photos and a pattern review. Sounds handy right? They are always running contests too. If you like to sew, check it out. You might win something!
The Great Pattern Review Sewing Bee

Monday, May 14, 2012

Mothers Day at Lowes Buying Plants and a Pattern Review

We rewarded our Saturday weeding with Sunday planting. Here we are choosing flowers. The top I am wearing is one I made for the 'Best Patterns' contest at Pattern Review. This is my review:
Pattern Description: Very Easy Vogue, number 8634. Voted one of the best patterns of 2010 (It must have been a tough year.) My description is different from the pattern envelope. I would say it is a loose fitting, pullover top with raglan sleeves and a lame cowl neck. But then you might not buy it or even be interested in reading this review...ooops! There is hope, read on.

Why I chose this pattern for the Best of Patterns contest:

I have a bin full of fun knit fabrics and I am committed to sewing with what I already have as much as possible. Normally, cowl necks are good for me. In general, I like interesting necklines and I thought I could play with this one a bit to make it better. I am a sucker for raglan sleeves, espiecially with the 2 piece front idea. Color blocking! Fabric mixing! My daughter would say "I know, right?"

Pattern Sizing: Make a size smaller than you would based on your measurements. I measure 38,30,40 so size 16 patterns are usually perfect for me. I made a medium, size 12-14 and it is roomy. Also your fabric stretch is going to greatly affect the size you choose. My patterned cotton fabric is just a one way stretch. No Lycra nor Spandex woven into this, just cotton. Not as stretchy as the pattern envelope recommends. So imagine how big it would be, if I had followed their suggestion and used only two way stretch knit. The stretch lace is a two way stretch and you do need that on the sleeves. I would say this top is roomy enough to make it in a woven with stretch sleeves if you wanted. Did it look like the photo/drawing on the pattern envelope once you were done sewing with it? I think it is still recognizable.

Were the instructions easy to follow? Very easy, but I added a couple of steps of my own.

What did you particularly like or dislike about the pattern? I was skeptical about the cowl. It looked so limp and lifeless on the other 38 people who reviewed the pattern before me. I knew that I could improve upon it with some playing around on the dress form, so when it came to adding the cowl, I stitched only one edge of it right sides together with the top. I wasn't sure whether I was going to cut it smaller or make it bigger. I put the top on my dressform and played with the cowl fabric. I found that my fabric had enough body on its own to make a fairly good cowl with no adjustments. Still, I wanted to give it a little more body and a drawstring for interest. I have posted several photos on Flickr with comments to show how I did it.

Fabric Used: The patterned cotton fabric came from Girl Charlie Fabrics The stretch knit came from ebay.

Pattern alterations or any design changes you made: I eliminated the front seam.

Would you sew it again? Would you recommend it to others? For Fall, I think I will do a dress version of this with long stretch lace sleeves. I have another patterned knit that looks good with the teal stretch lace. I recommend it with caution.

Conclusion: Ha, Ha. As I was writing this review and looking at the photos of me in the top on Mothers Day, remembering what a warm day it was, and how my arms were perfect, but my neck was a little warm...I realize that a cowl neck on a short sleeved shirt is STUPID. So I cut it. I cut about 8" off of the cowl and I am refashioning the neckline. I will post an edit with the new neckline. I did receive compliments on Sunday, even with the cowl.

Sunday, April 22, 2012

Vintage Vogue 8728


Vintage Vogue 8728
Originally uploaded by studiocherie
I was inspired by one of the entrants in the red dress contest at Pattern Review. When I read a few of the reviews of this pattern and how much everyone loved it, I got excited to make one for myself. My original idea was to make it entirely of lace and wear a cute slip underneath. Then I saw the Dolce Gabbana 2012 Spring line on Pinterest and was inspired to mix the lace and a feature fabric. My first draft mixed the lace and cotton and I made the original skirt which is very full and gathered - not good. For this version, I found a silky poyester with a nice drape and drafted a bias cut skirt. The pattern has quite a bit of ease, like 2.5" in the waist, so I think it would look a little better with a belt. I covered a strapless bra with the feature fabric to wear underneath.

Sunday, January 2, 2011

Made with Simplicity 2298

When I saw this Apron in the Fall Simplicity Catalog, it was a bit of a thrill for me because the designer of this apron, Joan Stroh, is someone I interviewed for my article on sewing pattern licensing. When I saw her designs featured on the inside cover of the catalog, I had even higher hopes for my catalog placement. Still waiting to see the Spring catalog for my pattern by the way. The December 17th date that Simplicity gave me must have been the printing date. Looks like JoAnn's might have it beginning of February.
I posted a pattern review for this project at Pattern Review. I highly recommend this for gifts. The ladies I made these for were thrilled on Christmas morning.

Tuesday, June 29, 2010

This dress makes me feel like...


Amazon woman.
I can't believe he just took that picture!
(Secretly glad he did though.)
Now for the pattern review... Simplicity 7707 from 1976. I just read on the SewMamaSew blog, in this great post from Mena Trott, that you want to pay attention to the era when working with vintage patterns. She likes the 1940's patterns for their judicious use of fabric. This dress called for over 3 yards of fabric (I might have been arrested in war time for using that much fabric on myself.) I made it with 2 yards. (Note to self: need older patterns - not more fabric.) The pattern was really easy and I made it in a couple of hours.

Before you try this at home, here are few things to consider:
1. It may look like a sundress, but it's not.
- Your entire waist as well as your thighs (except in Sumo-Mode) will be covered in a double layer of fabric.
-If you make it according to the instructions (which I did not - this will not surprise anyone who knows me) you will also have a double layer of fabric on the entire bodice. This will make the layers on your waist total 4. Not lining the bodice saved me about a yard of fabric.
-It has full coverage on the back as well. Not very sundressy.

2. You will want either a matching bra (because it will show a little on the sides) or you will want to wear a blouse underneath. More layers! I think this is a great dress for a woman who works in an office with the A/C running full blast. You can look breezy while keeping warm.

3. The mid calf length is just too much for all of this fabric. I took 5" off the pattern. I will probably take another couple of inches off to modernize it more.


4. There is a totally unnecessary seam in the middle of the bodice. I set the stitching line on the fold and cut it out on the fold instead.

5. Unless you want to look like a dork, you will have to change the neckline. (Did I just say that? It's the end of the day, and my powers of delicate speech have diminished.)

Overall, I think this dress is a neat idea that I will re-work again soon. Much lighter fabric than this heavy linen blend (I swear it must be linen blended with goose down, it is so hot.) I am on the lookout for cotton lawn with an old fashioned french vibe. Gotta have me some of that je ne sais quois.

Thursday, June 11, 2009

My First Pattern Review Contest Entry Part 1

First I want to say that I have a new respect for all of the clothing designers out there. Starting from absolute scratch for a garment for myself is challenging. I followed the instructions in a book called Body Mapping to make my base pattern, this is also called a sloper or a block. I don't know if you can tell from the photo, but the sleeve is not symmetrical. When I drafted it, I thought it must be wrong. Imagine my surprise when it turned out to be the best fitting sleeve I have ever worn. This motivates me to work out. (just a little) Now that I have a block that fits me perfectly, there are lots of things I am going to design for myself. For this contest, I am going to keep it really simple and make a tunic. After that, I will also make what I hope will be my favorite summer dress this year and a jacket. This last photo is of the muslin. They want to see this for the contest. This is not the finished tunic, it's like a rough draft. I have until the end of the month to complete the finished garment, but I have some orders to fill first, so wish me luck.

Monday, June 8, 2009

I like it hard

I bought this wonderful hard back sketch book from my friend Randi at Ragnazidnar, and my first sketch is of the tunic dress I am making for a contest at Pattern Review. For this contest, I am having to make my own garment completely from scratch. I have always started with a shape taken from something ready to wear or modified patterns before, so this is new for me. Honestly, it is harder than slipcovering a wingback chair. First of all, chairs don't move. Secondly, my own body is the dressform. You can imagine the awkward moments I am having with myself. I am keeping it simple though, so I should be able to get it done in time. Luckily for me, I don't have any complicated curves. I will be posting the pictures here because I will need something to link to when I enter the contest. Everyone who enters will receive a software program that will supposedly help them organize their sewing room. If the software doesn't work, I will ask my mom to send me a recording of her voice saying stuff like, Cherie, tsk, tsk, how can you work in this? what will you do if Martha Stewart drops by? Oh, Cherie, did you get your sewing room cleaned up yet? etc.

You all know I love a challenge and am a contest entering fool. Now I am in this Etsy voter thingy along with 7 teammates from the treasury team, 2 from the Eastern Washington team and at least one from the Carried Away Bag makers team. I don't know what the prize is, but I want it! Go here to vote (for me I hope.) Mine is the only eyeglass cozy chosen for the challenge, so I am hoping that will help. It also happens to be my best selling pattern right now, so I know someone likes it!


And if you like my new sketch book, Randi also sells a tutorial for how to do your own Coptic binding. I am going to have to get that one! My next blog post will be of my tunic sketch and the pattern pieces I have made for the garment contest. I am putting that here to make myself do it.