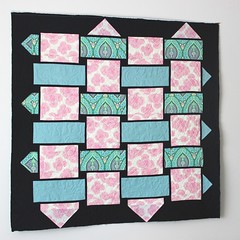
I am excited about getting this out in pattern form. I pinned it to my bedroom wall to take a photo. It motivates me to bind it, so I can hang it properly. The solid is an Amy Butler linen I have had forever. The other 2 are also from Amy Bulter. I love how it brightens the wall behind my king size bed. This quilt is 51" square. I have Alice piecing another one for me in a bed size out of Parson Grey fabrics for my son. He is going to love it.
This was the first project I used to try out my new EQ quilting software. The one drawback is the software does not allow for strip piecing which is how I do this quickly, so I need to write the instructions by hand. Using EQ, I was able to audition fabrics for the quilt without cutting into it, which was great. The program also gives you yardage which is awesome. So far, I am glad I got the program.
Lots more happening right now, but I wanted to pause and share this with you.
Tuesday, February 25, 2014
Tuesday, February 4, 2014
Using Quilting Cottons on the Departure Satchel
 You know I prefer home decor weight or outdoor fabrics for the departure satchel, but I did recently make one with quilting cotton. I want to help you use your incredible stashes of quilting cotton, so I have made some notes for you here.
1. Plan on having a dry clean only bag. That way, you can use the duck without prewashing it. The finish on the duck is really nice if you don't wash it and I think it gives the bag better shape.
2. The lining of the bag can be made following the original instructions. The only changes are to how to handle the exterior fabric. (and the duck if you use it without washing)
3. Back every exterior piece with decor bond heavy weight fusible interfacing. You can buy it by the yard at JoAnn's.
(If you insist on your bag being washable, I do not recommend the iron on interfacing. You will have to find a sew-in interfacing to substitute. You are looking for thin but stiff interfacing. That is what I love about the decor bond.)
4. Add piping at the end of step 3 and at the end of step 6, going all the way around the front and back of the bag. Also, piping at the top of the trolley sleeve is nice.
(I added lining in the front pocket which is really nice, but it would not be necessary if I had used piping on the pocket instead. Next time, piping on the kangaroo pocket. Also, my fabric got too thick at the top front for the piping, which it would not have been had I not lined that pocket and used the piping instead.)This is how I love to travel, with both the duffle and the departure satchel. They look great together too.
Subscribe to:
Comments (Atom)


