Saturday, December 29, 2012

Duffle Quilting Plan


In answer to a question over at Craftsy.This is how I quilt the duffles because I make a lot of them and I wanted to quilt them just enough to hold the fabrics together and have it be fast and easy. My duffles are not about the quilting. I have seen some amazing duffles by quilters who really put themselves into it and it shows in the stitching. I have seen 1" horizontal stripes of quilting - that looks awesome. I have seen diamonds, vertical stripes, and squares.  If you look at my favorites on Flickr, you can see a variety of duffles made from my pattern with different quilting.
 Also, as you can see from my apron sew along, "tomorrow," means "next time." Or maybe even "the time after." Obviously, Christmas got in the way this month and lots of orders for tablet cases and aprons and duffles. All of which I am very happy about and grateful for. I appreciate you and I hope you can be patient as I am not ready to commit to blogging everyday. In fact I am looking at unplugging more and trying out real life for a change in 2013.

Thursday, December 6, 2012

Apron Sew Along Part 2 Peter Pan with Lace

Adding lace or piping to the Peter Pan collar is a great way to personalize your apron. The red Christmas fabric I found had a lace motif, so naturally I wanted to play on that. If you choose flat lace like I did, you will have to add ease to it. I ran it though the machine with a long stitch and pulled it a bit to slightly gather it. I stitched it to the right side of the upper collar with the lace edge on the inside - it will turn to the outside later and it is then you will need the ease to go around the curves. It is stitched on the 3/8" seam allowance. The lightweight interfacing is also stitched in here on the wrong side of the collar.
The next step is to stitch the under collar rights sides together with this piece. I pin it in place on top of this, then I turn everything over and stitch from the interfacing side, so I can stitch over the top of the previous stitching. I lifted up the upper collar so you can see the layers in the photo above.

When everything is stitched together, grade and clip the seam. Grading is simply cutting off half of the seam allowance from one of the fabrics so that the seam allowance is not bulky. Clipping is cutting triangle shaped pieces with the point coming close to the seam. This reduces the bulk in any curved seam.
Understitching will help the collar lay right. From the right side of the under collar, I stitch close to the seam, stitching the seam allowance to the undercollar. I press with my fingers as I go. Getting a presser foot into the curve of the collar is a trick. You need to use your smallest presser foot. I used my freemotion embroidery foot. Not ideal because I have to feed the fabric myself, but it is the smallest foot I have and I can get into the curve with it. Better than stitching by hand for me.
After the understitching, I press the collar. If you are making the Peter Pan collar without lace, you still do all of these steps, just without the lace. If you are doing the collar with piping, don't worry about gathering, the piping will stretch around the curves. I would empty the cord out of the ends of the piping, so the first 3/8" of piping and the last 3/8" of piping are empty of cording. If you use cording, grade the cording during the grading step.
Press the seam allowance under the neck edge of the collar and the under collar as shown here:
I hope this post is helpful to you. Let me know if you have questions!  Next up will be the reversible collar.


Monday, December 3, 2012

Apron Sew Along Part 1

Here are the 2 aprons I am making for the sew along:


They each take one yard of main fabric. A half yard of contrast collar fabric. One yard of lining fabric (both of these are lined with a nice white cotton I found on sale at Hancock.) and 13 inches of lightweight interfacing. The apron on top could be reversible, but I would never want to turn it around because I love Cori's fabric, so I just made it lined.

It's late, so I am going to post the easiest parts first. I like to do them first too.
Making the apron strings is easy. I like about a 1 inch wide apron string. I prefer to tie mine in the back, so I only make them about 26 inches long. You will want to make yours longer if you like to tie them in the front. The apron pattern is written for long strings - about 40 inches each. Play with your measuring tape to see what length you want. For the 1 inch width, I cut my strings 3 inches wide.
I press the long edges in about half an inch.  I also press one end in about half an inch. Then I press the long folded edges together. I stitch this closed about 1/8th of an inch from the folded edges.
After pressing the apron strings I like to press my 10" bit of bias tape for the key hole in the neckline. Cutting on the bias means cutting at a 45 degree angle from the grain of the fabric. If you had a square of fabric that was cut on the fabric grain, that would mean cutting diagonally from one corner to another. A quilters ruler will have 45 degrees marked to make it easy to cut bias strips.

Making the edges off set, will help you later when you apply the bias tape. You have the narrower part on top and the wider one underneath. That way when you stitch from the top, you are sure to catch the under part too.

I am off to bed now. Tuesday nights are pretty hectic around here, so I will plan on posting how the collars come together on Wednesday.
I hope you will join me for this sew along. You will love your new apron. The pattern for both of these is in one PDF, you can pick if up at Craftsy or on Etsy.

Friday, November 30, 2012

Christmas Apron for Sew Along

I will be showing details like how to add lace to the Peter Pan collar, and how to make the loop for the button and loop closure. I am working on another version today that has piping for a pop of color in the collar - will show that too. Tune in here next week!

Tuesday, November 27, 2012

Apron Sew Along Part 1, Printing

I brought 2 aprons with me to Seattle for Thanksgiving and had to leave them behind for my mom and my sister. I think the women on your gift list will love having an apron from you too.

The first of my apron patterns is out and available on Craftsy. It includes the Peter Pan Collar apron and the reversible apron. The format is new, so there are special instructions for printing it. This is what the printing dialog will look like for printing the pattern pieces: (page 1 is the printing instructions and pages 8-14 are the pattern pieces)
and below is the dialog for the pattern booklet.  It is a little complicated to print this way rather than just clicking the printer icon, but I think you will like the pattern format. It will make the pattern nice to use and to keep.  If you want it to look like a professionally printed pattern, you can print page 2 on glossy cover stock (page 3 is intentionally blank) and pages 4-7 on nicer copy paper. After stapling into a booklet format, trim around the top and right sides of the cover photo. Let me know if you have printing questions or comments.
 I am working on the other apron pattern this week - the one with the pointed collar, Edwardian collar and standing collar options. Next week, the week of December 3rd, I will get into the actual sew along for this first pattern with detailed photos. All you have to do to be part of this sew along is get the pattern on Craftsy and follow along here. You  have time to get your fabrics and pre shrink them now.  If there is enough interest, I will start a Flickr group so everyone can post photos of their aprons. After this sew along, I will do another sew along for the other pattern.

Friday, November 16, 2012

Apron with Peter Pan Collar

This pattern will have 2 versions - the Peter Pan collar as shown, and a reversible version with a different collar. My inspiration for doing these aprons with collars? Dan Bennett's fabric line, Wild Garden. When I saw the blue print, I wanted to make a shirt for myself. Then I thought, how much would I really wear it? As I was reaching for my old apron around dinner time, I thought - I need a new apron. Then, bam! the 2 ideas collided and produced 2 new sewing patterns. I have to go sew up the reversible version now. I will show the blue fabric on that one.

The pattern cover mock up photo shows the other pattern, that one has 3 collar options and one of them may be reversible, we will see. These are fun! You can see some of the other collar options on Flickr by clicking on the photo of the white and colorful apron.

Saturday, November 10, 2012

My Favorite Duffle Fabrics

I get the question from time to time about what fabrics to use for sewing up the duffle pattern. As I was typing out my response to the question over at Craftsy, I realized it would be better as a blog post with links.
Thanks for asking! There are 3 types of fabric I use in this pattern. The main exterior fabric I like best is home decor weight cotton. If you like Waverly fabrics, there are a lot of good choices at JoAnns. The rose fabric I use is Waverly Norfolk Rose. Also any of the 45" wide home decor fabrics on bolts at JoAnns work well. That is where I found the black and white houndstooth - and I bought all I could find in Washington and North Idaho. The fabrics in my main photo on Craftsy are all Amy Butler Fabrics. At Westminster fabrics you can find modern designers like Joel Dewberry, Ty Pennington, and Amy Butler. They all have home decor weight cottons that work well in a variety of prints. The great thing about using those designer fabrics is they have coordinating/contrasting fabrics in quilting weight to use for the strap fabric. You can use quilting weight for the main fabric as well, but I do like the home decor weight better for it's durability. The bag shown above has Amy Butler home decor fabric from her Lark collection paired with Kaffe Fassett's paisley jungle in tangerine.
When I quilt the main fabric, I like to use a premium quality muslin for the back. That becomes the inside of the bag. I don't use fashion fabric for that because you don't really see it. You need a high quality fabric there though because it is getting used as you load and unload the bag. My favorite for this is Kona premium muslin. I have linked to the 44 inch wide, but it does come wider if you are making more than one duffle.  A lot of my links take you to fabric.com. One of the things I like about ordering from them is free shipping on orders over $35. If you ordered all 3 fabrics together, it comes to about $50, so your shipping is free.
I get my jute webbing at JoAnns. I like the quality they carry. I have ordered it elsewhere, but I did not like it as well.
JoAnns is also where I go for the batting I use. They don't have the one I use online, but it looks like this one. The one I use is Soft n Crafty batting in the 8 ounce. The one online is 10 ounce which would be too hard for you to work with. I get a lot of questions about the batting. Yes, you can use any batting you like. I suggest if you are using black fabric that you use black batting.  I use the 8 ounce (and after making hundreds of duffles I still like it the best) because it makes the bag stand up on its own while it is empty. I need that for photographing the duffles. If you would rather fold your duffle and put it in the linen closet when you are not using it, you can use something like warm and natural for the batting. The very first duffle I made was with warm and natural and I still use the bag. It is holding up perfectly well to tons of use. It is easier to sew with the thinner batting. If ease is a factor and you don't need photos, use the lighter batting. JoAnns has loads of coupon and sales. I never pay full price there. Usually, the prices I pay at JoAnns are lower than I could get wholesale.
I hope this helps you! Please feel free to ask questions.
Here is the post with the quilting plan I use:
Quilting the duffle fabric

Wednesday, October 31, 2012

Be the Lucky Winner


Some sayings I believe. Check out those shops if you like inspirational word decor. I want to talk about it a little in the context of my life and work right now. My Kickstarter is off to a slower start than I imagined, and that had me down a little yesterday. Before ever launching the project, I envisioned it going out in the Kickstarter email and getting amazing support from all kinds of people. I never even considered what it would look like if Kickstarter did nothing to promote it and it was all up to me. If I had considered that, I would have built an email newsletter list. If you have a business but no email newsletter opt-in, change that now. You don't know when you will need it. Even if you have no newsletter to send out, start preparing your list of people who have given their permission for such a time as this. I have over 6500 people who have bought from me on Etsy and almost 1,000 on Craftsy. I could have a huge email list. By this time next year, I will have a huge email list. There are more projects coming - like maybe a book - and I will need to get the word out.
My friend Amber over at One Shabby Chick - a very popular sewing blog because she sews amazing stuff and shares it - is having a great giveaway. I want to link you to the giveaway, and say thanks to Amber. You can earn extra entries into the giveaway by pledging on my kickstarter, yay! The pledges are coming in. We love contests, don't we?
The Kickstarter project is not a contest for me. It's not like I am asking people to vote for something I made so I can have the honor of being the best. I am asking people to contribute toward the significant expansion of my business. And it's not simply a contribution. People who back my project are getting rewards equal to the full value of their pledge. I provide excellent products. I believe in the patterns and the sewn items I make. I use them myself.  I actually make tangible, valuable products.
Why do I want to expand? There are a few people in my neighborhood who would love to sew for me and get paid. They have things like insurance, groceries, and power bills. I had a business coaching session a while back in which the coach, Maria Marsala, encouraged me to think about the day when my business could help other people by providing jobs. I think it's time for that. My own family has needs that require a bigger business to fulfill them. I think the printed patterns and the sewing notions lines are the right way for me to expand right now. So don't vote for my project, back it! Encourage your friends who don't sew to back it. Facebook has been a great way to spread the word beyond our sewing circles. Just copy the link to the kickstarter page and paste it to your status on Facebook. Or after pledging, there should be a prompt on Kickstarter for you to share on Facebook too. You, my blog readers, are some of the most supportive and giving people I know. Many of you have already pledged support. Thank you! I wanted to put this out there in case there is a lesson in it for someone in the future.
Connect with me personally on Facebook and/or connect with my business page on Facebook. Join me, and let's rock this thing. I really want to show Kickstarter that this little sewing business can make it even without their newsletter.

Friday, October 19, 2012

StudioCherie on Kickstarter

This is my big news. My Kickstarter campaign. If you have never heard of Kickstarter, I think you may become enchanted with it as I have. It is a place to go to support fellow business owners as they expand. I have supported everything from musical art projects to marshmallows. And now it's the place I chose to reach out for funding to expand my business. I think you will love my new printed sewing patterns and I hope a lot of you will back my project at the $12 level to gain access to these patterns as they launch. No one else will be able to buy them one at a time. They are meant for quilt shops. If you make luggage tags by the ton the way I do, there is a huge time saver for you there too.

Monday, October 1, 2012

Been a long time


Duffle Line up with me
Originally uploaded by studiocherie
There are big things in the works here. It's not that I don't have anything to say. I have been working from 9AM to 10PM most days. I do break for yoga and the occasional walk in the woods. Here is the short list of what is happening:
* new patterns being worked on (as always) Backpacks are still next.
* I've made 3 or 4 things that were not on the list of patterns to produce, but now they are. Maybe I should call that off-road sewing. Fun, small projects.
* I have an intern! Yay. She deserves her own blog post.
* I have a fabulous local graphic designer working up new pattern covers for me. I am reformatting my patterns into a fun, booklet format and packaging them for quilt shops. The luggage tags pattern is done and Sew EZ Too in Spokane will be carrying them this week. This is a big project and I am really excited about reaching a new audience in the quilt shops. I have been selling wholesale patterns in my Etsy store for a couple of years, but these are upgraded versions.
* To go along with the above, I am applying to Quilt Market for the Spring show in Portland.
* I am getting ready to package notions to go along with my patterns. Usually my zippers are custom sizes and colors. I am going to start selling those. I have another line of notions that I won't tell about until they launch, but I am excited about it.
* In the Spring, you will see my iPad case pattern and the Kindle Fire and Nexus Patterns, all 3 together bundled in the Simplicity catalog.
* My next 2 patterns for Simplicity will be furniture patterns!
* And a couple other things I am not ready to share.
I will try to be better at keeping in touch here. I do appreciate you being here.

Monday, May 14, 2012

Mothers Day at Lowes Buying Plants and a Pattern Review

We rewarded our Saturday weeding with Sunday planting. Here we are choosing flowers. The top I am wearing is one I made for the 'Best Patterns' contest at Pattern Review. This is my review:
Pattern Description: Very Easy Vogue, number 8634. Voted one of the best patterns of 2010 (It must have been a tough year.) My description is different from the pattern envelope. I would say it is a loose fitting, pullover top with raglan sleeves and a lame cowl neck. But then you might not buy it or even be interested in reading this review...ooops! There is hope, read on.

Why I chose this pattern for the Best of Patterns contest:

I have a bin full of fun knit fabrics and I am committed to sewing with what I already have as much as possible. Normally, cowl necks are good for me. In general, I like interesting necklines and I thought I could play with this one a bit to make it better. I am a sucker for raglan sleeves, espiecially with the 2 piece front idea. Color blocking! Fabric mixing! My daughter would say "I know, right?"

Pattern Sizing: Make a size smaller than you would based on your measurements. I measure 38,30,40 so size 16 patterns are usually perfect for me. I made a medium, size 12-14 and it is roomy. Also your fabric stretch is going to greatly affect the size you choose. My patterned cotton fabric is just a one way stretch. No Lycra nor Spandex woven into this, just cotton. Not as stretchy as the pattern envelope recommends. So imagine how big it would be, if I had followed their suggestion and used only two way stretch knit. The stretch lace is a two way stretch and you do need that on the sleeves. I would say this top is roomy enough to make it in a woven with stretch sleeves if you wanted. Did it look like the photo/drawing on the pattern envelope once you were done sewing with it? I think it is still recognizable.

Were the instructions easy to follow? Very easy, but I added a couple of steps of my own.

What did you particularly like or dislike about the pattern? I was skeptical about the cowl. It looked so limp and lifeless on the other 38 people who reviewed the pattern before me. I knew that I could improve upon it with some playing around on the dress form, so when it came to adding the cowl, I stitched only one edge of it right sides together with the top. I wasn't sure whether I was going to cut it smaller or make it bigger. I put the top on my dressform and played with the cowl fabric. I found that my fabric had enough body on its own to make a fairly good cowl with no adjustments. Still, I wanted to give it a little more body and a drawstring for interest. I have posted several photos on Flickr with comments to show how I did it.

Fabric Used: The patterned cotton fabric came from Girl Charlie Fabrics The stretch knit came from ebay.

Pattern alterations or any design changes you made: I eliminated the front seam.

Would you sew it again? Would you recommend it to others? For Fall, I think I will do a dress version of this with long stretch lace sleeves. I have another patterned knit that looks good with the teal stretch lace. I recommend it with caution.

Conclusion: Ha, Ha. As I was writing this review and looking at the photos of me in the top on Mothers Day, remembering what a warm day it was, and how my arms were perfect, but my neck was a little warm...I realize that a cowl neck on a short sleeved shirt is STUPID. So I cut it. I cut about 8" off of the cowl and I am refashioning the neckline. I will post an edit with the new neckline. I did receive compliments on Sunday, even with the cowl.

Friday, May 11, 2012

Great White Background with Gimp for Etsy Sellers

I have had several people ask for my help lately with their Etsy listings. It has been a while since I posted any Etsy marketing tips here, so here are a few quickies that have to do with photos. Your product photography is the most important aspect of selling online. It is really 99% of the information the buyer needs to make a decision. There is a ton of information on the Etsy blog, under Seller Handbook, but I wanted to get straight to the point with the last several questions that have been asked of me.

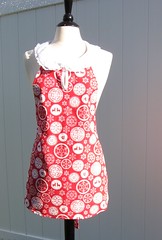
The first thing you may want to do is photograph your items on a white background. For items that are small enough to sit on a chair, I use tag board from the dollar store to set up a cyc. See the photo below. The way the tagboard is set up with a curve makes it a cyc. I like tagboard better than fabric for small items because it is smoother. I set myself up where the lighting is best - usually outside or sometimes near a window. (I also have photo lighting I use in Winter. I sold successfully on Etsy for a couple of years before I splurged on lighting.) There was some haze over the sun this morning, but just barely - the light was pretty direct. Your ideal lighting would be an overcast day. Since my lighting was almost harsh, I added the light reflector - before I bought this, I used anything white (like a second piece of tag board held in place by a second person.) The reflector bounces the light back to the object from the shadow side which softens the shadow.
Make sure the sun is coming from the side, so you can take photos without casting a shadow on your subject. Photograph your item from all of the angles that a buyer would want to see. If I wanted to photograph something held in hands on this white background, I would either set the camera on a tripod and use the timer for my own hands, or get a second person to stand behind the chair and hold the item down in the white zone. Sometimes it is nice to have hands in a photo. Make sure they are clean unless maybe your item is for gardening.

Now here is the step by step I do with GIMP. GIMP is a free downloaded photo editing program that works a lot like photoshop. I have developed these steps to edit my photos for Etsy listings.

1. Do a rough crop to crop off any unnecessary edges. Crop to the height of the item you want to show, and allow extra on the width to crop later.
Cropping with GIMP - choose the crop tool from the tool box (circled in blue.) Click and drag to draw a rectangle around your item. Refine the rectangle by hovering near the edge until you see an arrow, then you can move the edge out or in. Move the entire rectangle by hovering in the center until you see the move symbol which is 4 arrows, then you can drag the rectangle around the image. When you are ready to make the crop, either single click in the center of the rectangle or hit the enter button on your keyboard.


2. Resize the image for best appearance on Etsy. Etsy likes images that are 1000 pixels wide and 800 pixels tall.  From the top menu on GIMP, choose Tools, Transform tools, and Scale.
When the scale pop up box opens (see the one below,) make sure the link between width and height is connected (just click on it it connect the links.) In the height box (the lower box,) type 800. When you click on the width box (the upper box,) you will see the corresponding width, probably something larger than 1000, depending on your crop. Click scale.

3. After you click scale, it will look like the screenshot below. The canvas is still the original size, so we want to crop this time to exactly 1000 wide by 800 tall. Choose the crop tool again from the tool box. Draw your rectangle around the photo.  After drawing roughly the rectangle I need, I find it easier to get the exact size by using the size dialogue inside the toolbox (see blue arrow.) I type 1000 and 800 into the spaces. Then I hover in the middle of the cropping rectangle and click and drag to position it. When I have the crop placed where I want it, I single click in the center of it, or I hit the enter key.

4. Make the white pop! This picture is already pretty bright, but the background appears a little grey. I want to make it pop as much as possible. From the top menu, choose Colors, and Levels.

There is a picture of the levels dialogue box below. I use the dropper that you see is highlighted in blue. That is the white sampler. The one to the left of it is a grey sampler and the one on the far left is the black sampler. Choose the white sampler dropper by clicking on it, then touch it to the best white on your photo and click. You will see the whole photo adjust. If you don't like how it came out, you can click reset instead of OK and try again. When you get it right, click OK. Even though this was already a bright photo, I think you can see how the background changed from a little grey to really white.

5. One more step before saving. In the top menu, click Image and Flatten Image.

6. Click File, Save As, and then you can file the photo where you want it and give it a name you like. I save as whatever.jpg

I hope this helps a few of you who want to improve your shop appearance for more sales!

Sunday, April 22, 2012

Vintage Vogue 8728


Vintage Vogue 8728
Originally uploaded by studiocherie
I was inspired by one of the entrants in the red dress contest at Pattern Review. When I read a few of the reviews of this pattern and how much everyone loved it, I got excited to make one for myself. My original idea was to make it entirely of lace and wear a cute slip underneath. Then I saw the Dolce Gabbana 2012 Spring line on Pinterest and was inspired to mix the lace and a feature fabric. My first draft mixed the lace and cotton and I made the original skirt which is very full and gathered - not good. For this version, I found a silky poyester with a nice drape and drafted a bias cut skirt. The pattern has quite a bit of ease, like 2.5" in the waist, so I think it would look a little better with a belt. I covered a strapless bra with the feature fabric to wear underneath.

Sunday, March 25, 2012

Simplicity Catalog Page Summer 2012

The release date I got from Simplicity for my newest sewing pattern with them was March 23rd. I need to run by JoAnn's today and see if the new catalogs are in. Their models are cute as can be. I am really excited to have this dress and skirt in the catalog. Simplicity pattern 1821 for girls size 3-8.

Friday, March 16, 2012

Customer Success Show-Off Time

Ellen sent me this lovely photo of the duffle she made from my sewing pattern, and I wanted to show it off here for several reasons. First, I have not made any in tiny prints and I wanted to show you how darling that can be. Also to let you know it is perfectly fine to use whatever batting you like for these. When you use the thinner batting, it does not stand up on its own empty, but it will when you fill it up. I think it makes storing the bag easier too. The other thing is the straps. Notice she didn't use jute webbing. I thought maybe she had found a 4" wide twill tape, but it is actually 2 side by side pieces of 2" twill tape. She butted them against one another and zigzagged them together.  I like to dry clean my duffles because I like the jute handles.  For those of you wanting a washable duffle, I recommend using this 2" wide twill tape - prewashed of course. I would buy 8-9 yards of it to make sure I had enough after shrinking. Ellen just started a blog too, here she is, the crafty geek.

Another customer show-off that turned up in my Etsy feedback as an appreciation photo (I love those) for my luggage tags pattern. Here is what she said:
Thank you! This pattern is great; actually I liked it so much I incorporated the tags into my wedding invitations. Highly recommend this pattern!
I thought it was very clever how she made the paper long enough to easily pull out of the tag. Lovely photo too.

Wednesday, March 14, 2012

Anna Maria Horner

Anna Maria Horner, me, and Carrie Jarvis, owner of The Top Stitch. Last Friday, I had the very special opportunity to meet and hear from Anna Maria Horner. She is a lovely person, an artist, and a fabric designer. A few things I have made with her fabrics:
Listening to Anna Maria talk about her career path was encouraging for me. She still does pretty much everything herself. She does not have the staff I imagined. She does have one full time assistant. So now when I dream of being more productive, I can envision starting with just one person. Makes the dream much closer. She does the computer part of her design work on Gimp. (I am so glad someone asked her the question.) I have been reluctant to spend the money on Photoshop, but now I have a free alternative with Gimp. I have only just started playing with it, but it seems a lot like photoshop. If it is powerful enough for Anna Maria Horner, I know it can do everything I need too. It was such a treat to meet one of my design heros. Her upcoming book is going to be amazing. Here is Anna Maria's blog.

Tuesday, March 13, 2012

Sweater to Shrug

It was a boring cashmere sweater. I have a lot of boring sweaters. I will wear it more as a shrug. I left the sleeves long and wear them rolled up in the photos. I like that I can wear them up or down if it gets chilly. I hope this post encourages you to dig out a neglected thing from your own closet and turn it into something you will wear.  More photos on my Facebook cover page.

Sunday, February 19, 2012

Sew Alongs

Quite a while back, while I was ignoring my blog, another super sewing blogger asked me if she could do a sew along with one of my patterns on her blog. I expected 8 or 10 women to make my bag all together, but it turned out to be more like 45 or 50. It was really pretty amazing. Here in the final post about the sew along, you can see some of the wonderful variety of fabrics chosen for the project. If you want to read it, you might have to use google translate. Just looking at the pictures is fun though. Sew alongs are quite the internet phenomenon. From quilters (who have done this kind of thing through quilt shops forever) to dressmakers, sewing along is a popular and fun way to push yourself out of your comfort zone or make yourself complete a project that might otherwise get left behind. Thanks for doing the sew along Karin, I hope all of your talented friends are enjoying their bags.

Saturday, February 18, 2012

Ways to win a free pattern right now

There are 2 ways you can win a free pattern from me right now. On Pattern Review, I am sponsoring the red dress contest. If you can make a red dress and post a pattern review before the end of this month, you will win your choice of any one of my patterns. I love Pattern Review. It is a great resource and community of sewists. Click on the contest link to see the lovely dresses that have already been entered. The last time I sponsored a contest there, I think we set some kind of record for participation. I love that I can give everyone who enters a prize. They deserve it! Check out some of the great bags the winners have made with their free patterns. This link goes to their StudioCherie pattern reviews.

The second way is to become a fan of StudioCherie on Facebook. Use the contact me button there to send me a message with your pattern choice. The 3 patterns to choose from are here in this photo album.

Sunday, January 22, 2012

Shop Makeover

There is an excellent article over on Etsy's blog about making over your shop. The seller who wrote the article, has a really dramatic difference when you look at her first sold items, like mine below

and her current shop - mine below.


She managed to go from all kinds of color to all neutral, which is really pleasing to the eye, if you can do it. It really makes her shop makeover look dramatic. I am left with a riot of color. I think it will always be that way, since I am not about to start specializing in white and tan bags. Someone could do that with great success though... She mentions having a great product - that is really the starting point. If you are there, you are ready for a shop makeover.  I think the key to my success on Etsy has been not so much the visual makeover of my pattern shots (brighter fabrics, fewer graphics, context in some cases) but the consistent addition of new products. I am always doing both though - improving the photography and adding new choices.  It's a full time job. I just wanted to encourage you to read the article on Etsy and do what you can for your own shop.

Saturday, January 21, 2012

Weddings made beautiful with help from friends


One of the things I love about the Etsy wedding stories is how many times friends help to craft a truly special day. I wanted to share this message from Devin who recently made 120 luggage tags for her friend's wedding.
Hi Cherie,
I purchased your luggage tags pattern in August with the intention of making about 120 of them the hold the escort cards for a friend's "french/vintage-travel" themed wedding. Well, it was a success! The bride found some absolutely PERFECT fabric and we had a couple days of assembly-line style cutting an ironing before I got to the sewing. A ton of fun! Wedding guests loved them.


Another thing that Devin did which I thought was noteworthy - she punched the holes 3 at a time using a 3 hole punch! Very clever. Here is a link to the hole punch she used. Thanks for the note and the photos Devin. Your tags turned out gorgeous.

Wednesday, January 11, 2012

Sneek Peek Kindle Fire Cozy Stand

This will be the next sewing pattern out. I am working on it now. I will also have the Kindle Fire covers for sale in my Etsy shop. I am considering this for a Kickstarter project too. Making enough of them to sell on Amazon. I have some leg work to do to organize that though.

Tuesday, January 10, 2012

Meet the Team


Inland NW Etsy Team Holiday Show from Brian Chace on Vimeo.
This video is my quick (30 seconds each) take on 20 of my teammates on the Inland Northwest Etsy team. It's about discovering new talent, which I think is one of Etsy's strong suits in the online marketplace. Developing talent. Belonging to a team. If you have an Etsy shop, but you are not on a team, I hope this video moves you toward finding one. If you would like to check out their shops, here they are in the order of appearance on the video:

Thursday, January 5, 2012

Customer Success Story


From Michele
Originally uploaded by studiocherie
I get some really nice messages from the women I have helped to sew something they wanted. Rarely these messages come with photos. I want to start sharing those here. I am just tickled for Michele, who was able to achieve a $1400 dining room makeover for $250. Here is her message to me:
Hi Cherie,
I just wanted to say thank you so much for putting together this tutorial! The directions on how to sew the pieces together was a bit confusing to me, as this was my first real sewing project since Home Ec in middle school (more than 20 years ago). But, the pattern technique was spot on! I purchased 6 upholstered parsons chairs from a church yard sale for $50 and used about $200 (big risk!) in fabric. I would have had to have paid at least $200 a piece for similar chairs with custom fabric. I attached pics so you could see the before and after. Thank you for encouraging sewing newbies to give it a try!

Michele, I love your new dining chairs. Notice the trim she added to her curtains to coordinate - beautiful touch. Congratulations. I hope this is the first sewing success of many for you. Thanks so much for taking the time to share your results.

Tuesday, January 3, 2012

Book Winner

Comment number 4 was randomly chosen as the winner of the Fabric by Fabric book.  Looks like Marci Girl will have a reason to stop hoarding those Anna Maria Horner fabrics and start using them! Congratulations, Marci. I will get in touch with you to get your address.