A quick how-to with links to the materials. At the new studio, I have a built-in computer nook. My monitor, keyboard, printer and speakers took over the entire desk. There was no room for a notepad, calculator, phone, etc. And it was boring. Not allowed! I was going to wallpaper the wall, but I opted for stapling fabric to the wall instead. 2 yards of wide home decor fabric at JoAnn's was less expensive than the paper I wanted (and it will be easier to remove if I move.) To get a nice straight edge at the top, I used a 1/2 inch strip of cardboard (find it in upholstery shops.) The top edge of fabric is right side to the wall and the cardboard runs along the wall/ceiling edge on the wrong side of fabric. I stapled through the cardboard and fabric to the wall and the fabric comes over the top of that so the staples are hidden. The sides and bottom are just turned under and stapled. I may get decorative tacks to cover the staples, but I only used a few and they are not noticeable.
The keyboard tray is from Office Depot. You need about a 33" opening to install it according to the instructions. My opening is 30" Just contact me if you have a similar situation and I can tell you how we made it work. I love it!
The shelves are from Lowes. You need to cut "x's" in the fabric for installing anchors for the shelf brackets. Move the fabric away from the anchor area to keep your drill from catching on a thread and eating the fabric. (I have no experience with that whatsoever - just guessing that might happen...)
The crate that elevates the printer to give me another storage nook is from Michaels. I will paint it to match the shelves (in my dreams.)
The chair slipcover is from my easy pattern you can find on Craftsy.
Thursday, May 15, 2014

Don't miss out on Craftsy's Mystery Markdown Flash Sale!
**This post contains affiliate links and I will be compensated if you make a purchase after clicking on my links
Don't miss out on Craftsy's Mystery Markdown Flash Sale! Enjoy big savings on nearly 200 yarns/fabrics and project kits now. Limited supply, shop before it disappears! Hurry, offer expires Friday, May 17 at midnight PST 2014. |
Sunday, May 4, 2014
How to Raise Up Tables to Counter Top Height
I have a new sewing studio, so I have lots of projects to share for setting up your studio or craft room in a great way. The first thing on my list was to get my work tables up to a good working height - to save my back and neck. I scoured the internet for a good how-to for this project, and found nada. My husband, Rory, had a great idea, so we did it his way. In the photo, you can see me standing at the new working height table which is 35" high. We took the risers off of the cutting table so you could see the original height was 6" lower. I wrote the tutorial as photos, so you can easily share on pinterest.
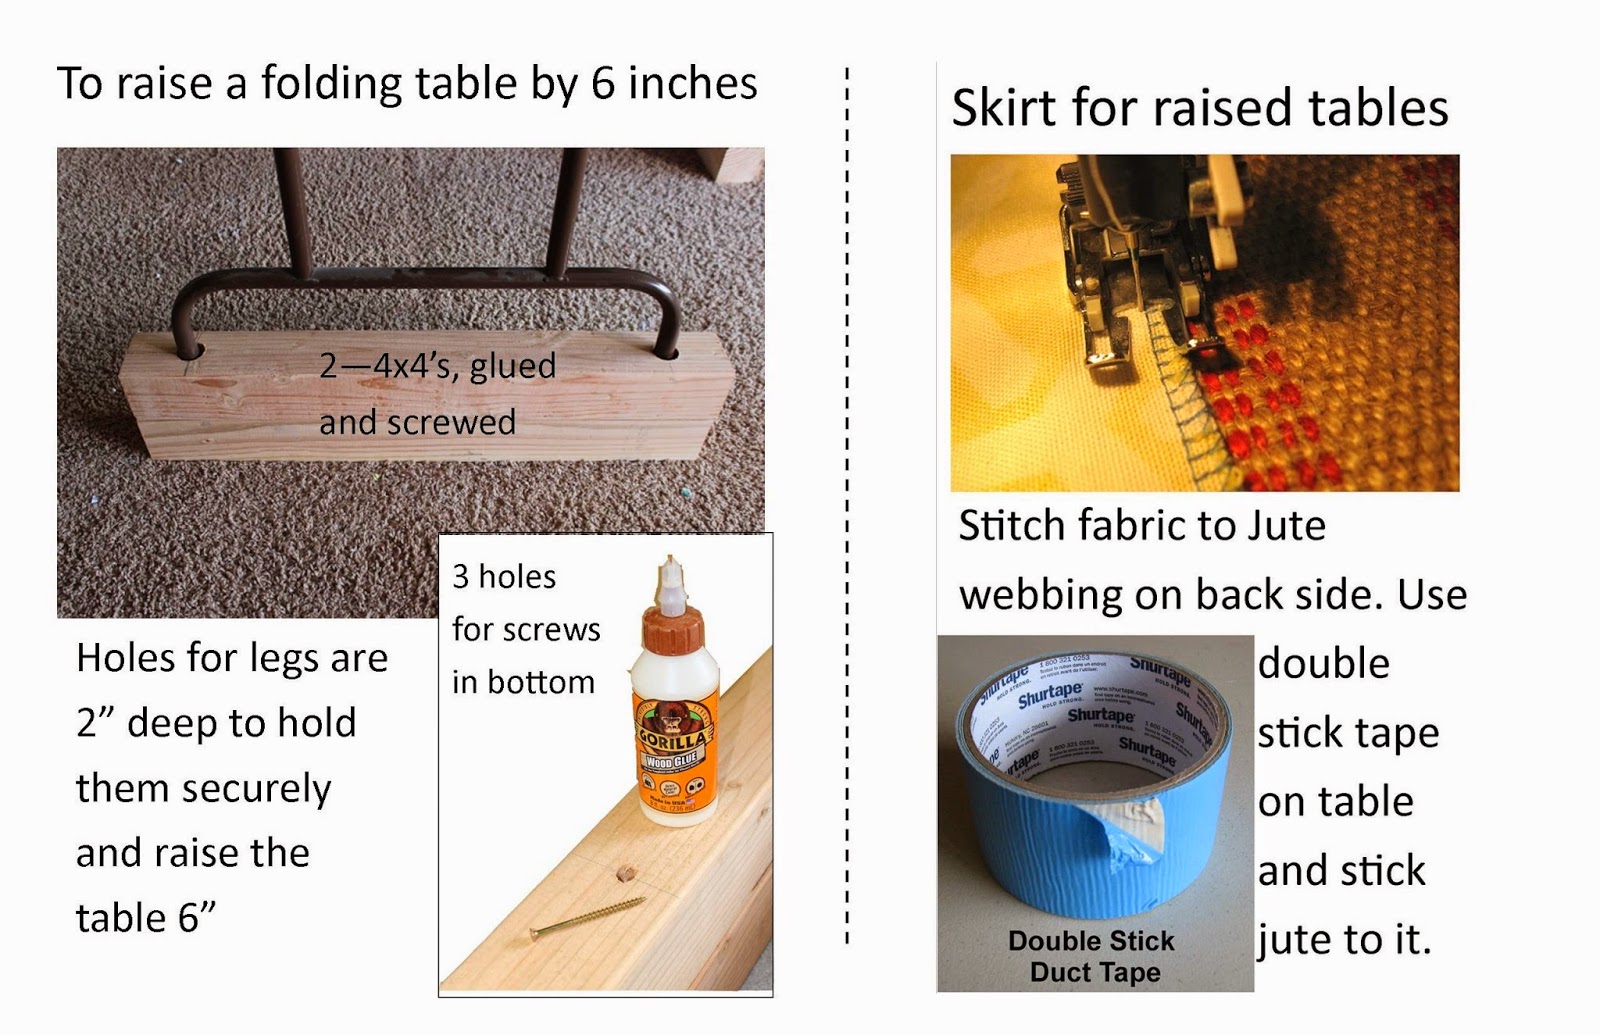
Raising the folding tables was easier than I thought. Of course, it helps to have a friend with a wood shop. Once they were on their new risers (4x4's glued and screwed together so they were 8 inches tall and holes for the table legs 2 inches deep to hold securely) I could not wait to get skirts on them. The skirts are 34 inch lengths of extra wide fabric - luckily I had enough - you may need about 10 yards of fabric if you are doing 2 tables like I did. On the backside of what you can see, I have stitched the fabric to Jute webbing. I found double stick duct tape at Lowes and stuck that to the tables, then the jute sticks to the tape. I love it! I hope this little how-to helps you upgrade your creative space.
Raising the folding tables was easier than I thought. Of course, it helps to have a friend with a wood shop. Once they were on their new risers (4x4's glued and screwed together so they were 8 inches tall and holes for the table legs 2 inches deep to hold securely) I could not wait to get skirts on them. The skirts are 34 inch lengths of extra wide fabric - luckily I had enough - you may need about 10 yards of fabric if you are doing 2 tables like I did. On the backside of what you can see, I have stitched the fabric to Jute webbing. I found double stick duct tape at Lowes and stuck that to the tables, then the jute sticks to the tape. I love it! I hope this little how-to helps you upgrade your creative space.
Subscribe to:
Comments (Atom)


