 I don't usually announce every new item in my shop here on the blog. I am announcing this one because I think there were a couple of you looking forward to the duffle pattern, and it took me longer than I thought to publish it. So here is the link to the duffle PDF pattern. There is at least one more new pattern coming this month. It will be a fun, crafty, gift item with not much sewing. I may announce that one too just because it is such a different project. Hope everyone has started thinking about crafting for the Holiday Season, I sure have. Feel free to post in the comments the thing you are most excited to make as a gift this year, and I will send a fun, surprise gift to my favorite commenter. I will post a comment when I have picked someone.
Showing posts with label DIY gift. Show all posts
Showing posts with label DIY gift. Show all posts
Monday, October 5, 2009
New Pattern and a Surprise Gift
I don't usually announce every new item in my shop here on the blog. I am announcing this one because I think there were a couple of you looking forward to the duffle pattern, and it took me longer than I thought to publish it. So here is the link to the duffle PDF pattern. There is at least one more new pattern coming this month. It will be a fun, crafty, gift item with not much sewing. I may announce that one too just because it is such a different project. Hope everyone has started thinking about crafting for the Holiday Season, I sure have. Feel free to post in the comments the thing you are most excited to make as a gift this year, and I will send a fun, surprise gift to my favorite commenter. I will post a comment when I have picked someone.


Tuesday, December 23, 2008
Last Minute DIY Gift - Family Calendar - Free Tutorial

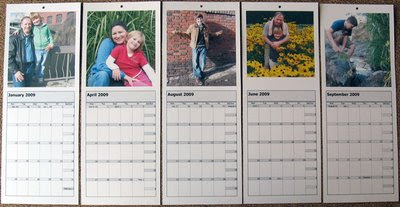
 This one will hang in Rory's office, so it's full of his favorite photos of our family taken throughout the year. I fell in love with this size (4.25" x 11") while browsing Etsy for cool calendars. The one I made for my mom has mostly photos of the kids with some pretty floral shots interspersed.
Here is what you need:
- 7 sheets of letter size 110# card stock
- 13 digital photos
- microsoft outlook or another program that has blank calendars
- printer

- hole punch
- 10" piece of ribbon or string
The calendars on outlook 2000 are geared for the work week, so the weekends are small (Saturday and Sunday smooshed into one box.) Since this one will only be used in his office during the week, that worked out fine. The XP version of Outlook will give you a full 7 day calendar, and the instructions are the same. First, set up outlook as follows:

Outlook>Calendar>File>PageSetUp>MonthlyStyle>
Format Tab>Options>Layout=1page/month and check the "print exactly one month per page" box Fonts=24pt headings and Shading Box is checked
Paper Tab>Type=Custom; Dimensions=4.25"wide and 11"tall; Margins=Top:5", Bottom:.25", Left:.25",Right:.25"; Page size= custom 4.25" x 11"; Orientation=Portrait
Then, Set up your printer for normal, portrait, 8.5 x 11" paper
The way to navigate from month to month on outlook 2000 is View>Go to>Go to Date>click on the arrow next to the highlighted date, the monthly calendar will pop up and click on the 1st of the next month, then click ok.
Navigation on Outlook 2007 is Go>Go to Date> and the same as above from there.
Print one monthly calendar on each side (front and back) of the paper, offset from one another, so you can cut them apart later, after you have added the photos.
After printing all of the months, you can use WORD to print your photos. Set your page margins in WORD as follows: Top=.5" Left=.25" Right=4.5" and Bottom=6.25", then use "insert" to insert your photo onto the page and print onto the appropriate month.
Finish by cutting the pages in half, punching holes at the top center of each, running ribbon or string through the holes, and tying a knot.
Jan DiCintio, over at ScoutieGirl, made her own calendars too. Hers are covered with her sketches for fabric designs, printed professionally in black on white, and would be so much fun to color!
And if you don't need it personalized, but you want a professional looking calendar that you can print yourself and give, check out this shop I just found on Etsy - BlueTricycle - some great choices there.
Subscribe to:
Posts (Atom)