
Sunday, June 22, 2014
My favorite tools, part 1


Saturday, June 21, 2014
Cutting out piping before slip covering
This little tutorial is the answer a great question I received this morning in my Craftsy Class. The question is
the arm chairs I want to slipcover have existing piping. How do I handle that?
My answer is that you cut it out. I have a chair I want to slip cover, so I will show you on it.
Step one: Clip as close as you can to the attachment point of the piping on both ends of a length of piping. You can pull that length of piping out from one of the ends.
the arm chairs I want to slipcover have existing piping. How do I handle that?
My answer is that you cut it out. I have a chair I want to slip cover, so I will show you on it.
 |
Step one: Clip as close as you can to the attachment point of the piping on both ends of a length of piping. You can pull that length of piping out from one of the ends.
 |
| If you know you will be cutting the fabric away, you can make a slit at an easier place to pull from. You will still need those clips at the ends to free the piping. |
 |
| Step 2: Pull out the piping. |
 |
| Step 3: I find that the fabric that went around the piping is almost as bulky as the piping itself, so I like to cut it away completely. Just be careful you do not cut the seam. As you can see, the upholstery is still passable with the piping cut out, so if your chair has to be uncovered for a couple of hours while you wash your new cover, it will look okay. I hope that helps! |
Tuesday, June 10, 2014
Sewing Manifesto - Bust that Stash!

Are you finding it hard to tackle the next project? Are you afraid you might be burned out? Sometimes, when you have completed a big project (or 5) you need a boost to get you sewing again. A motivator. A mantra. Words to magically make sense of your mounds of fabric. A reminder of how much and why you love sewing. Start brainstorming. I am talking about building a personal sewing manifesto. Jot down the ideas that inspire you, and post them on the wall. I used GIMP to make mine fun (In my studio, if it's not fun, it doesn't get done) with different sizes and fonts. Feel free to print mine and use it, or find what speaks to you, and make your own. A manifesto may be the encouragement you need to reinvigorate your work.
My latest projects include 3 new sewing patterns for Simplicity, watch for them in upcoming catalogs:
Simplicity #1335 A furniture pattern with 8 projects included. Shipping June 13th.
Simplicity #1241 An apron pattern with 3 style options and mother, daughter, doll sizing for each. Shipping October 10th.
Simplicity #1236 A casserole carrier pattern that includes gift baskets and bowl covers. Shipping October 10th.
Simplicity #1241 An apron pattern with 3 style options and mother, daughter, doll sizing for each. Shipping October 10th.
Simplicity #1236 A casserole carrier pattern that includes gift baskets and bowl covers. Shipping October 10th.

And an exciting new Slipcovering Class at Craftsy. The class will be available next week. Enter here for a chance to win the slipcovering class for free. Winner will be announced on the 18th of June.
I hope you will use my sewing manifesto or write your own. If you are looking to bust your stash like I am, check out this amazing quilting class that is available now over at Craftsy.
Thursday, June 5, 2014
Big class sale at Craftsy
You know I love Craftsy classes. This is your chance to give them a try at incredibly low prices.
Craftsy's BIG Summer Sale: Save Up to 50% on ALL Online Classes!
Want to learn a new skill or brush up on an old one? Now is your chance! You can save up to 50% off on ALL online classes at Craftsy's BIG Summer Sale! Cooking, cake decorating, sewing, gardening and so much more... all up to 50% off, with some classes starting at just $9.99! This is a sale not to be missed, so make sure you hurry because it ends at 11:59pm MT on Monday, June 9th.
**This post contains affiliate links and I will be compensated if you make a purchase after clicking on my links
|
Thursday, May 15, 2014
Before and After Computer Nook Makeover

The keyboard tray is from Office Depot. You need about a 33" opening to install it according to the instructions. My opening is 30" Just contact me if you have a similar situation and I can tell you how we made it work. I love it!
The shelves are from Lowes. You need to cut "x's" in the fabric for installing anchors for the shelf brackets. Move the fabric away from the anchor area to keep your drill from catching on a thread and eating the fabric. (I have no experience with that whatsoever - just guessing that might happen...)
The crate that elevates the printer to give me another storage nook is from Michaels. I will paint it to match the shelves (in my dreams.)
The chair slipcover is from my easy pattern you can find on Craftsy.

Don't miss out on Craftsy's Mystery Markdown Flash Sale!
**This post contains affiliate links and I will be compensated if you make a purchase after clicking on my links
Don't miss out on Craftsy's Mystery Markdown Flash Sale! Enjoy big savings on nearly 200 yarns/fabrics and project kits now. Limited supply, shop before it disappears! Hurry, offer expires Friday, May 17 at midnight PST 2014. |
Sunday, May 4, 2014
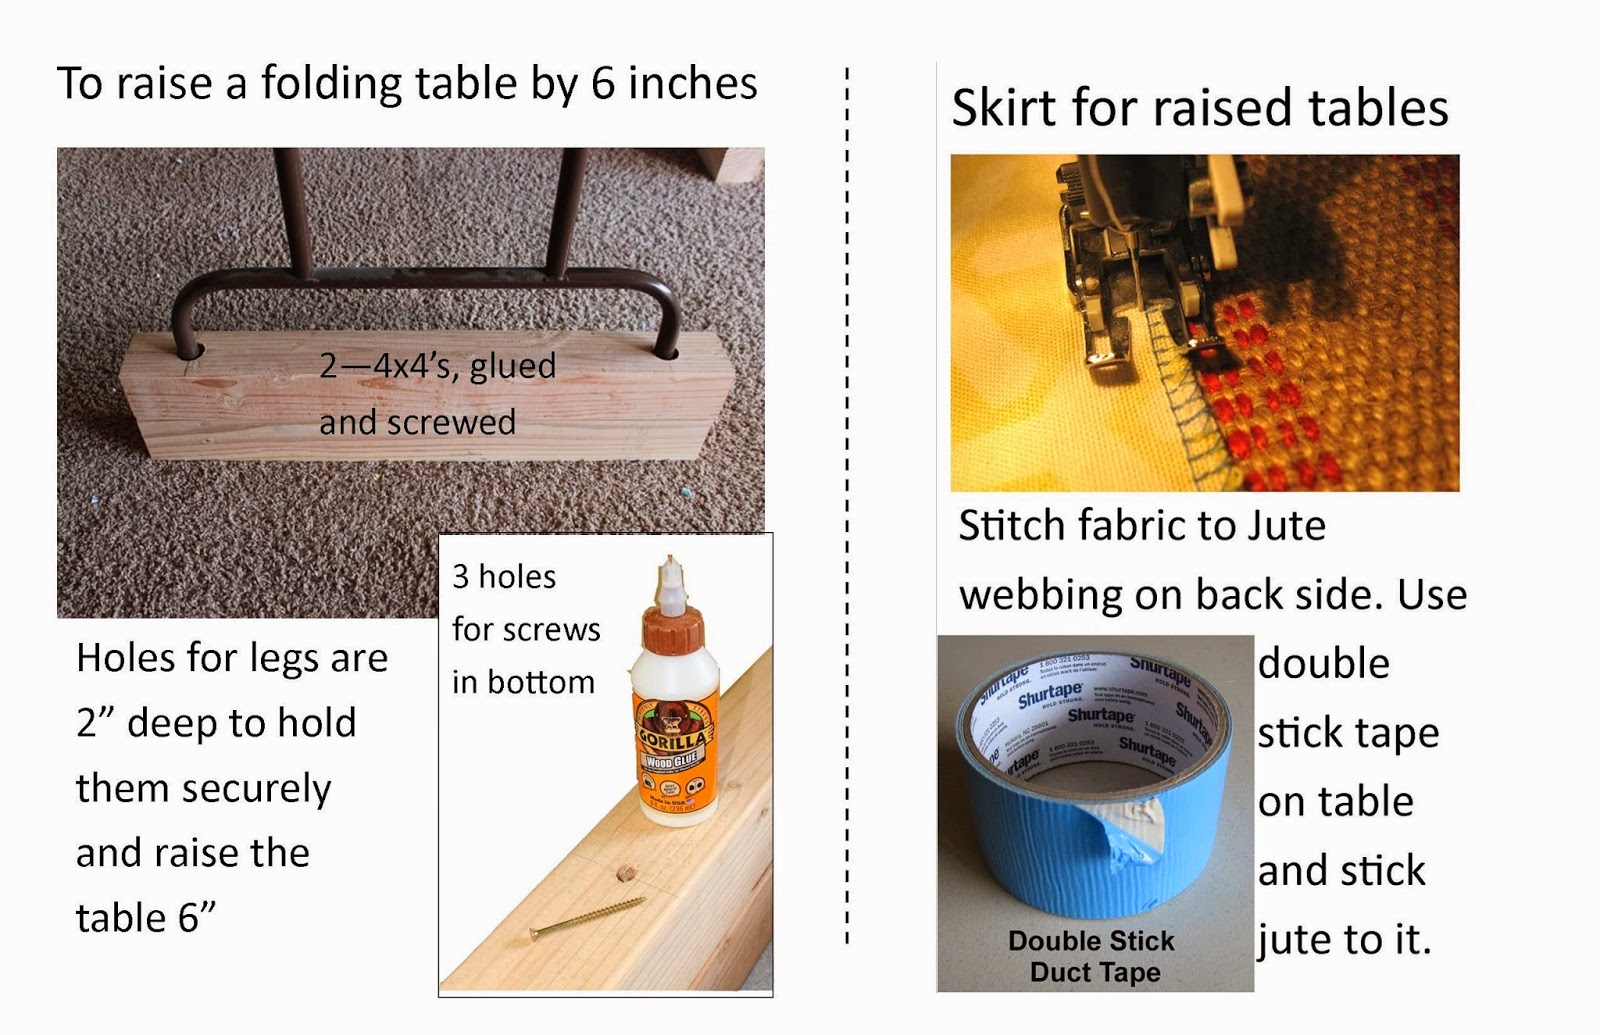
How to Raise Up Tables to Counter Top Height

Raising the folding tables was easier than I thought. Of course, it helps to have a friend with a wood shop. Once they were on their new risers (4x4's glued and screwed together so they were 8 inches tall and holes for the table legs 2 inches deep to hold securely) I could not wait to get skirts on them. The skirts are 34 inch lengths of extra wide fabric - luckily I had enough - you may need about 10 yards of fabric if you are doing 2 tables like I did. On the backside of what you can see, I have stitched the fabric to Jute webbing. I found double stick duct tape at Lowes and stuck that to the tables, then the jute sticks to the tape. I love it! I hope this little how-to helps you upgrade your creative space.
Subscribe to:
Posts (Atom)