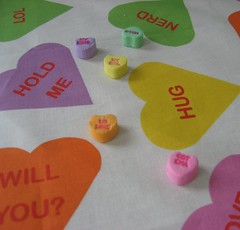
My first Spoonflower fabric is ready! I have got the printed Spoonflower color guide to make sure my colors are exactly what I want. This is as close to perfect they can do on the sweethearts colors. The one I could change is the orange, I could lighten it up, but I think I like it this way. I did scoot the hearts around from the original a little, so a person could cut the fabric in strips and use it as a border or incorporate it into a quilt easily. It also looks great as a whole piece of fabric to make a quick quilt. The white space between the hearts allow room for a quilter to show off her sweet freemotion skillz. Watch for 2 coordinating fabrics. If you want to make banners, this one is ready to order now. I was amazed at how quickly Spoonflower shipped it to me - I had it in hand in less than 7 days. A fat quarter will have 30 usable hearts, which translates into 4 yards of banner. The whole yard has 125 hearts.
Here is the link to the fabric itself at Spoonflower. You can see the other 2 fabrics there as well. They will be ready to order by this time next week.
Showing posts with label valentine gift. Show all posts
Showing posts with label valentine gift. Show all posts
Sunday, January 9, 2011


Friday, December 31, 2010
Sweetheart Valentine Banner Tutorial
 There is a very exciting announcement and preview at the end of this post, so scroll to skip to that if you don't want to read the step by step. I think this Sweetheart Valentine Banner is simple enough for you to duplicate without illustrations on the step by step tutorial that follows. I just ask that you link to this post if you want to share the instructions. Also, if you want to make them for sale, go ahead and give me credit for the idea. If you have never purchased one of my patterns, just know that the instructions here are representative of how I explain things, but my patterns for purchase include pattern pieces and loads of illustrations and extra notes on tools and materials. Here is the how to:
Materials list (makes 112 flags for 16 yards of banner)
2 yards Décor bond interfacing—A heavy weight, fusible interfacing
1/4 yard each Pastel cotton fabrics—I used pink, yellow, green and purple
1&1/8 yard Pink cotton duck fabric
16 yards 1/2” heavy cotton twill tape plus 1/3 yard for every separate banner. If you are making 16 one yard banners, you need 5 & 1/3 more yards of the twill tape for tails. If you are making 2 eight yard banners, you need another 2/3 yard.
3 or 4 sheets of iron-on light T-shirt transfer for ink jet printers
Instructions:
Step 1:
Print backwards words onto the transfer paper. If you want to make your own sheet of words, either make the sheet backwards, and print normally as I have done, or make the sheet forward and tell your printer to print a mirror image. The font I used is Arial Rounded MT Bold. The font size varies between 30 and 36. These need to dry for at least 1/2 hour before you use them. Make the words red.
Step 2:
While the transfer paper is drying, make your paper heart pattern pieces. To make your own heart pattern, mark a 3” square in the corner of a sheet of paper. Fold the paper in half, then in thirds, keeping the 3” square visible. Fold the 3” square in half and cut 1/2 of a heart on the fold through all layers. Take up as much of the 3” square as you can with the heart. When you open this up, you will have 6 identical 3” heart pattern pieces.
Step 3:
Following manufacturers instructions, adhere décor bond interfacing to the pastel fabrics to make them stiff. This makes cutting the heart shapes much easier.
Step 4:
Pin heart pattern onto pastel fabrics and cut out heart shapes. I layer the fabrics and cut through 2 fabrics at a time.
Step 5:
Following manufacturers instructions, iron the words onto the hearts. If you ever wanted an excuse to buy one of those mini irons, here it is.
Step 6:
Cut the light pink duck fabric into rectangular background flags. The size of the flag is 4.12” wide by 4.5” long.
Step 7:
Stitch each heart onto a background flag. Use thread that matches the background fabric or the hearts. Use either a small zig-zag stitch or a blanket stitch.
Step 8:
Stitch flags onto the twill tape. Leave a 6” tail on either end and leave 1.25” between each flag. This will produce banners that have 7 flags per yard. These flags are fun to make and customize for different people and occasions.
Here is the exciting announcement part: As I was making these Sweetheart Valentine Banners, I was wishing I had a pre-printed fabric with the hearts and words. I could do away with the need for a pattern piece. I could do away with the tedium of cutting out and transferring words onto the hearts. Hummm. So, after telling several people including my husband that I was not really interested in designing fabric...I designed my first fabric. I ordered a yard of it last night. As soon as I see it in person and verify that it is just what I wanted, I will make it available for order. This is a preview of what you would see on a fat quarter of fabric. The full yard has 125 hearts with 25 different phrases and the 5 basic colors you see here. It will be $18 per yard at Spoonflower, which is pretty cool since a yard of fabric will make 17+ yards of banner.

Saturday, January 31, 2009
An Etsy Love Story

About a dozen women were hoping to buy this bag for themselves and maybe even hinting about it to their husbands or boyfriends, but one lucky woman is about to get it for Valentines Day. I traded emails with the man who bought it, and discovered that his woman is crazy about Etsy and hearted this bag a while back. I think it is so sweet that he knew about it and bought it for her. I don't know your name, but you are one blessed woman to have a man who would study you like that. I say, he's a keeper.
Tuesday, January 27, 2009
Making Posters - Valentines Idea Number 3
 Since Valentine's and the 100th day of school tend to go together, it's fun to combine the themes. This poster of my younger son that we made for his 100 days of kindergarten project still brightens our hallway three years later.

What Daddy wouldn't turn to mush at receiving a poster of himself with his daughter for Valentine's day? This poster is about 20" long and 15" wide. It was printed on letter sized paper, the white edges were cut off, then the pieces were arranged and taped with double stick tape to a sturdy piece of tag board. For Caleb's poster above we left the white borders on and covered the poster with 100 kisses made from a rubber stamp and red ink. Here is the step by step instructions for printing your own valentine poster.
Using Microsoft Publisher 2007, the "how to" is easy.
1. Open Publisher and click on  >blank page sizes>posters>22x17 (or whatever size you want.)
 >blank page sizes>posters>22x17 (or whatever size you want.)
2.>Insert>Picture>from file>(I sized my pictures on photoshop to 20x16, and that is the file I used)

3.>File>Print Set up. Choose "Tiled" Choose paper size 8.5x11 "Portrait" Set the horizontal and vertical overlaps for .25

4. Once that is set. Check the print preview to see how it will tile print.

Voila, now you are ready for a Happy Valentines Day and only 80 more days of school 'till Summer vacation!
Thursday, January 8, 2009
Valentine Idea Number 1

I have quite a number of fleece scraps left over from the hundreds of changing pad bags I've made over the past couple of years. For his birthday in November, I gave my nephew a very long loop of fleece in his school colors. I pictured him sharing it with his girlfriend at football games. I talked him into modeling it with my son for the blog. It's not a product I am going to carry, so I was pretty casual about the photography.
 scarf for two print by theblackapple
I think Emily Martin captured the idea I had in mind in her artwork. It's just some 6" wide random lengths of anti-pill fleece sewn together on the serger because I like the look of the serging. When I was in highschool, I would have loved this as a valentine gift. Feel free to use this scarf idea for your own shop if you are so inclined.
Subscribe to:
Posts (Atom)