Showing posts with label spoonflower. Show all posts

Saturday, April 27, 2013

2 New Patterns and a New Fabric

I created a custom bag for a customer and I thought it would be one you might like too. Here is the new pattern. It's the duffle, re sized with some changes and improvements. The new size makes it a lot easier to sew. As you can see, I even quilted it more. For those of you who like to quilt, the more manageable size makes the quilting more fun too. The end pocket on the right holds a magazine perfectly.  I found a better way to explain the pleated zippered pocket and a new way to put it on that is a lot easier - that pocket is still on the other end. The ends are rectangular - taller than they are wide, so it sits atop your rolling luggage better. There is a sleeve on the back side that slides over the luggage handle to attach the duffle to the other luggage. Since this bag is a couple of inches shorter than the original duffle, I was able to use 2" wide webbing instead of the jute. This is going to give you some fun design options with color, and it makes the bag machine washable. I wrote it up with a new, faster way to attach the straps. (One of the benefits of making more than a hundred of something.)

Most of you probably know that the zip around wallet pattern is out. I have it on Etsy and Craftsy. Craftsy is actually better for me as a shop than Etsy, but whichever you like to use is great.  I decided to size it down as small as possible for the first version. I think it works great and have great feedback from those using it. Of course, my first custom order for one on Etsy is for someone with the iPhone5, and I researched just to make sure it will fit - and it won't. If you are making this pattern for the iPhone5, you will have to make it 1/2" taller. So you will split the base pattern in half at the center and add a 1/2" there. Also add the same to the interior and exterior pockets. The spine will need to be 1/2" longer and the zipper 1/2" longer. I will have to adjust the pattern pieces and release it again with both options. It is an advanced pattern though, so those of you who have it should be able to make all of the adjustments with no problem.


Just because I am not blogging, don't assume I am not creating anything. I drew those bears the other night. For my son's graduation, I am making him a special quilt from fabric I have designed. My daughter and I drew the vans, and I have a friend in Seattle who colorized the drawings. The vans fabric is available on Spoonflower. It has 6 different colorful vans on a fat quarter. They are great for a quilt sized project like mine. I will have to scale it down if I want to use it for Kindle Fire cases and smaller stuff. As soon as I decide on the size and layout for the bumper sticker bears "Cher Bears," I will get that uploaded as a fabric too. 

Mail Chimp makes me feel like a chump. I have a list of people who have signed up for pattern and product updates, but I haven't used it. I am hoping you all are reading the blog too.

Maybe someday I will be one of those sewing bloggers who learns how to post a picture and some words everyday. Or maybe even one of those who has a schedule: Mondays WIP, Tuesdays a recipe, Wednesdays something I drew, Thursdays Pinterest, Fridays Flickr, or something like that. Doesn't sound too hard, right? I don't think I could do the same thing every week. Maybe I need something more like a list of things to cover monthly, and I check them off as I do them. It's on my to-do list to blog better. Making the stuff is more important though.

Sunday, June 26, 2011

Kids Fabric Design Contest

I read about the Spoonflower kids contest just in time to mention it to Gabrielle. She drew a few rough sketches of designs. Some featuring squirrels and the things they like - trees and nuts. Some stripes and geometric designs. She was asking me which idea would make a good fabric design. I suggested she just draw and color something she really loved to draw like she was making a picture for a friend. After that, we could figure out how to turn it into a fabric. I love what she did. You know I am going to order her flower in the field fabric. If you click on the contest to see all of the great kids entries, keep your mouse hovering around the green arrow to get the photos to show up. You can vote for as many as you like. Seeing kids designs reminds me to keep having fun and make what I love.

Friday, February 4, 2011

collage of things I made with my first fabric set

These are made from my set of fabrics at Spoonflower. The smaller hearts and stripes are fun coordinates to have for the sweethearts fabric. The pillow case just happens to coordinate with Melissa Averinos fabrics which is perfect since Gabrielles room was already done in those. I sent the hug card along with one of the orders I filled for sweethearts banners. The hug might be a nice sentiment to send along for sympathy or get well cards. I am not going to say anything about my next fabric except that it will be something completely different.

Sunday, January 9, 2011

color check


color check
Originally uploaded by studiocherie
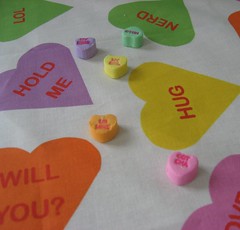
My first Spoonflower fabric is ready! I have got the printed Spoonflower color guide to make sure my colors are exactly what I want. This is as close to perfect they can do on the sweethearts colors. The one I could change is the orange, I could lighten it up, but I think I like it this way. I did scoot the hearts around from the original a little, so a person could cut the fabric in strips and use it as a border or incorporate it into a quilt easily. It also looks great as a whole piece of fabric to make a quick quilt. The white space between the hearts allow room for a quilter to show off her sweet freemotion skillz. Watch for 2 coordinating fabrics. If you want to make banners, this one is ready to order now. I was amazed at how quickly Spoonflower shipped it to me - I had it in hand in less than 7 days. A fat quarter will have 30 usable hearts, which translates into 4 yards of banner. The whole yard has 125 hearts.
Here is the link to the fabric itself at Spoonflower. You can see the other 2 fabrics there as well. They will be ready to order by this time next week.

Friday, December 31, 2010

Sweetheart Valentine Banner Tutorial

There is a very exciting announcement and preview at the end of this post, so scroll to skip to that if you don't want to read the step by step. I think this Sweetheart Valentine Banner is simple enough for you to duplicate without illustrations on the step by step tutorial that follows. I just ask that you link to this post if you want to share the instructions. Also, if you want to make them for sale, go ahead and give me credit for the idea. If you have never purchased one of my patterns, just know that the instructions here are representative of how I explain things, but my patterns for purchase include pattern pieces and loads of illustrations and extra notes on tools and materials. Here is the how to:
Materials list (makes 112 flags for 16 yards of banner)
2 yards Décor bond interfacing—A heavy weight, fusible interfacing
1/4 yard each Pastel cotton fabrics—I used pink, yellow, green and purple
1&1/8 yard Pink cotton duck fabric
16 yards 1/2” heavy cotton twill tape plus 1/3 yard for every separate banner. If you are making 16 one yard banners, you need 5 & 1/3 more yards of the twill tape for tails. If you are making 2 eight yard banners, you need another 2/3 yard.
3 or 4 sheets of iron-on light T-shirt transfer for ink jet printers
Instructions:
Step 1:
Print backwards words onto the transfer paper. If you want to make your own sheet of words, either make the sheet backwards, and print normally as I have done, or make the sheet forward and tell your printer to print a mirror image. The font I used is Arial Rounded MT Bold. The font size varies between 30 and 36. These need to dry for at least 1/2 hour before you use them. Make the words red.
Step 2:
While the transfer paper is drying, make your paper heart pattern pieces. To make your own heart pattern, mark a 3” square in the corner of a sheet of paper. Fold the paper in half, then in thirds, keeping the 3” square visible. Fold the 3” square in half and cut 1/2 of a heart on the fold through all layers. Take up as much of the 3” square as you can with the heart. When you open this up, you will have 6 identical 3” heart pattern pieces.
Step 3:
Following manufacturers instructions, adhere décor bond interfacing to the pastel fabrics to make them stiff. This makes cutting the heart shapes much easier.
Step 4:
Pin heart pattern onto pastel fabrics and cut out heart shapes. I layer the fabrics and cut through 2 fabrics at a time.
Step 5:
Following manufacturers instructions, iron the words onto the hearts. If you ever wanted an excuse to buy one of those mini irons, here it is.
Step 6:
Cut the light pink duck fabric into rectangular background flags. The size of the flag is 4.12” wide by 4.5” long.
Step 7:
Stitch each heart onto a background flag. Use thread that matches the background fabric or the hearts. Use either a small zig-zag stitch or a blanket stitch.
Step 8:
Stitch flags onto the twill tape. Leave a 6” tail on either end and leave 1.25” between each flag. This will produce banners that have 7 flags per yard. These flags are fun to make and customize for different people and occasions.

Here is the exciting announcement part: As I was making these Sweetheart Valentine Banners, I was wishing I had a pre-printed fabric with the hearts and words. I could do away with the need for a pattern piece. I could do away with the tedium of cutting out and transferring words onto the hearts. Hummm. So, after telling several people including my husband that I was not really interested in designing fabric...I designed my first fabric. I ordered a yard of it last night. As soon as I see it in person and verify that it is just what I wanted, I will make it available for order. This is a preview of what you would see on a fat quarter of fabric. The full yard has 125 hearts with 25 different phrases and the 5 basic colors you see here. It will be $18 per yard at Spoonflower, which is pretty cool since a yard of fabric will make 17+ yards of banner.


Thursday, October 28, 2010

Cherie rambles a bit on artwork licensing

There were a few more people I met on Etsy who have licensed their artwork and it just never worked out to do a full interview. Etsy did a quit your day job article with Becky of PoshDots, who is still in the throes of licensed products launching. Her shop remains impressive even as busy as she is, she has even expanded by putting her artwork on fabric.
By the way, for artists who might like to try their hand at designing art for fabrics, there is Spoonflower. You upload your artwork and spoonflower prints it on a variety of fabric types. You can even let people order your designs directly from Spoonflower. They have frequent contests, so there is a way to see how your work might be received. A number of Etsy sellers design fabric and have it printed at spoonflower, then sell it in their Etsy shops. Click this search to see items listed under the supply category with Spoonflower as a tag. Fabulous! ScarletFig is now licensed with Robert Kaufman Fabrics. I believe the contests at Spoonflower were instrumental in launching Laurie as a fabric designer, but I could be wrong. Laurie is writing a book...I am writing patterns, going to Israel, etc. I will ask her for an interview when I get home. How is that for journalistic instinct? Write about someone then ask for an interview. I think I am fired. Oh, that's right, I am the boss. Still, I think I am fired.
I want to mention KiriMoth, while we are talking fabrics. She is working with HautTotes and designing exclusive fabrics for Melissa's shop.
Reading the full shop announcement for Suzanne Woolcot's Shop, Gorjuss, is impressive. Obviously, a lot of licensing going on there. I hope you get better, Suzanne.
AudreyJeanneRoberts has quite the portfolio if you want to check out someone who has been successfully licensing for a while.
Okay, so now everyone here (I mean literally here) including me, is wondering what is for dinner. I need to answer this question now, even though I have not illustrated this post with any of the many lovelies that could have spiced it up so well. You will just have to click and explore for yourself. I hope you do. I think all of these gals are inspiring. I appreciate their talents and their dedication.

Friday, May 14, 2010

Teach your girls to quilt


Houndstooth Quilt 1
Originally uploaded by KimsCraftyApple
No offence, gentlemen. A couple of things have come together in my mind as this week has unfolded. The first part was getting a message from Laurie Wisbrun asking me if she could use photos of the reading glasses case she just bought from me in her upcoming book. YES. Laurie is the fabric designer also known as ScarletFig. I have loved her work via Spoonflower for a while now. The second part has been evolving as I have been working on some quilting projects this week. It's the idea that when we cut up fabrics and stitch them together again, we are designing a new fabric. That idea really hit home last night when I got the email with the link to this quilt top pieced from my houndstooth quilt pattern. Kim used hand dyed fabrics and so many colors, the quilt just twinkles! I never would have thought of a colorful houndstooth, but Kim did. I think this is a brilliant fabric design. Excellent work, Kim. Thanks so much for sharing. I think when we teach our girls how to quilt, we are opening up all kinds of design possibilities for them. I've said this before too - quilting will improve your other sewing. Find a local quilting class, like this one at Buttercuppity, and sign her up!