Wednesday, December 31, 2008

Feel, Felt, Found

toaster and pastries pdf pattern by GulfCoastPDF

I know several of you are feeling crazy about making stuff out of felt, and here's what I found....


Sometimes it's easier to get a pattern and follow it than trying to make it up yourself. GulfCoastCottagePDF has the cutest felt food and imaginative toys for children - in pattern form. Having one of these patterns would be like sitting at the feet of a master. You won't even believe how cute this stuff is.

retro robot by GulfCoastPDF


I have a new gadget here on the blog - look in the right column, under "How to Make Stuff." I have linked to other blogs that have tutorials, some widely known and some smaller ones. I have tried to categorize them for you. So if you love to make stuff, like I love to make stuff... I forget how the rest of the song goes (maybe it's "boy, boy, boy, what a blog?")...I think I need my refrigerator magnets now! If you know of a link that should appear in my "How to Make Stuff" thingy, please leave a comment.

Tuesday, December 30, 2008

Refrigerator Poetry - Easy DIY


Sometimes a girl needs a few choice words to arrange in order to release her inner lyricist. I gave two sets of these for Christmas. One was to Randi, who composed the poem shown here. I am hoping she is going to offer something like this in her shop soon. The other was to my niece. I think giving teenagers an emotional, poetic outlet is a good thing.


The how to is easy: stick adjectives, verbs, nouns, pronouns, conjunctions, adverbs, etc. to magnets and cut them out. Let the poetry flow. Now I've got to make a set for myself because I love making poetry this way.


Thanks for sharing Randi!

Tuesday, December 23, 2008

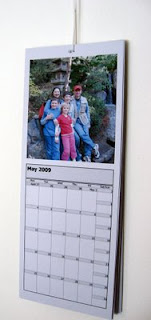
Last Minute DIY Gift - Family Calendar - Free Tutorial


This one will hang in Rory's office, so it's full of his favorite photos of our family taken throughout the year. I fell in love with this size (4.25" x 11") while browsing Etsy for cool calendars. The one I made for my mom has mostly photos of the kids with some pretty floral shots interspersed.


Here is what you need:
  • 7 sheets of letter size 110# card stock


  • 13 digital photos


  • microsoft outlook or another program that has blank calendars


  • printer


  • hole punch


  • 10" piece of ribbon or string

    The calendars on outlook 2000 are geared for the work week, so the weekends are small (Saturday and Sunday smooshed into one box.) Since this one will only be used in his office during the week, that worked out fine. The XP version of Outlook will give you a full 7 day calendar, and the instructions are the same. First, set up outlook as follows:

Outlook>Calendar>File>PageSetUp>MonthlyStyle>


Format Tab>Options>Layout=1page/month and check the "print exactly one month per page" box Fonts=24pt headings and Shading Box is checked

Paper Tab>Type=Custom; Dimensions=4.25"wide and 11"tall; Margins=Top:5", Bottom:.25", Left:.25",Right:.25"; Page size= custom 4.25" x 11"; Orientation=Portrait

Then, Set up your printer for normal, portrait, 8.5 x 11" paper

The way to navigate from month to month on outlook 2000 is View>Go to>Go to Date>click on the arrow next to the highlighted date, the monthly calendar will pop up and click on the 1st of the next month, then click ok.

Navigation on Outlook 2007 is Go>Go to Date> and the same as above from there.

Print one monthly calendar on each side (front and back) of the paper, offset from one another, so you can cut them apart later, after you have added the photos.

After printing all of the months, you can use WORD to print your photos. Set your page margins in WORD as follows: Top=.5" Left=.25" Right=4.5" and Bottom=6.25", then use "insert" to insert your photo onto the page and print onto the appropriate month.

Finish by cutting the pages in half, punching holes at the top center of each, running ribbon or string through the holes, and tying a knot.
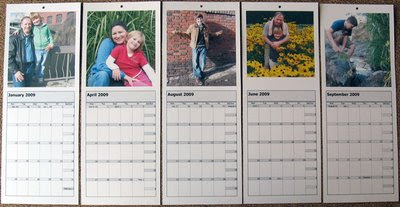

Jan DiCintio, over at ScoutieGirl, made her own calendars too. Hers are covered with her sketches for fabric designs, printed professionally in black on white, and would be so much fun to color!

And if you don't need it personalized, but you want a professional looking calendar that you can print yourself and give, check out this shop I just found on Etsy - BlueTricycle - some great choices there.

The Shoe Philospher, Part 3 of 5

conductor's cap by StebbyLee Studio


Although I appreciated the sorority girl’s put together look, I was always more relaxed in the company of men, and thus, never cultivated the desire to accessorize. My own shoe closet closely resembled a man’s. It consisted of hiking boots, running shoes, cross trainers, bicycling shoes, and 2 pairs of leather pumps (one black and one brown.) I could not tell you the brand name or designer of the dress shoes. Those details were of no consequence to me. For years, my favorite accessory was a baseball cap.


baseball brains magnet by LabelStone


With only a glancing awareness of accessories and their meaning and power in the feminine mind, I always puzzled over my lack of influence with other women. Couldn’t they see the freedom I had in going to my closet and choosing the black or the brown? Women should have been knocking down my door to find out how I maintained such a high self-image on such a low shoe budget!

digital collage by cemerony


Part 4 - the epiphany - next week.

Monday, December 22, 2008

2008 The Year of the Apron


If you sew, you know what I am talking about - the year of the apron. Flickr is a great place to check out if you want to be inspired by aprons or anything else you have a mind to search.

All of the kids in our family are future business owners. Hailey, who is 10, has her heart and mind set on being a pastry chef. It is wonderful to see how confident she is as she moves and works around the kitchen. This is my Christmas gift to her and I can post it here because she isn't a blog reader, yet. She got a blue parakeet for her birthday, so that is why he's on the pocket. It's a very simple apron design, featuring Amy Butler fabrics, that will look really cute on her.
cupcake infant hat by onasmallscale
Keep baking, Hailey, you are wonderful!

artwork on canvas by GeminiStudio

Wednesday, December 17, 2008

Is it smaller than a bread box?


We love playing 20 questions. (We are reminded of it everytime we watch Muppet Christmas Carol- seriously on my top 10 favorite movie list.)
I can just see my 14 year old opening his presents... "Oh, you got me a box of Ritz...thanks...um, just what I wanted."
"No, it's not Ritz, I reused the box. Open it."
"Oh (happy now) okay... It's underwear. That's better, Mom, thanks." (eyes roll)
If you look closely at the finished photo, you'll see a "G" monogram not made of wire and beads. Sorry Martha, I think I enjoy drawing them more than stringing and twisting them. Carol will still get hers though.
By the way, we are under a couple of feet of snow here, so it may be a few days before I can get anything to the post office. Next year, I'll bring Christmas presents to Seattle at Thanksgiving.

The Shoe Philospher, Part 2 of 5

journal by OctavineIllustration
I had a theory that I tested in my 20’s:
I asked well-turned-out women if they had belonged to a sorority.

Yes! Without exception, the women who obviously knew the secrets of accessorizing, the women with the big shoe closets and the drawer that was just for belts, and the cache of jewelry for any occasion were sorority sisters.

My plans to be a mover and shaker would have to be put on hold.

(I was kicked out of the sorority - not telling the story, so don't ask.)

First, I needed to hire a Grecian goddess to shop for me.


Grecian Goddess Wall Art by TackledandShackled

Tuesday, December 16, 2008

How to Sew a Slip Cover


As soon as I finish this posting, I will be officially listing my tea party chair slip cover pattern for sale in my shop. This pattern is made specifically to cover the IKEA AGEN child's wicker chair. I also have one of their plastic chairs called NYFIKEN, so that pattern will be coming out shortly.

I am excited about my new packaging- everything stuffed (neatly) into a printed white envelope.

If you don't mind leaving a comment here, I would love to know what kind of chair you would like to see me cover and make a pattern for you to copy.

Monday, December 15, 2008

The Shoe Philospher, Part 1 of 5


You can tell a lot about a woman from the size of her shoe closet.
The more shoes a woman has, the more aware she is of the power of details.
Outsiders may see a certain number of shoes in the closet as excessive or conspicuous consumption.
But the woman who owns the shoes knows subconsciously that each shoe has its purpose in the boosting of her power to influence other women.

Saturday, December 13, 2008

Followers

"Follow Me" by Sonia Romero
Hand printed linocut


My friend, Rachel, who is truly a lovely human being who also makes beautiful jewelry and yummy lip balm, suggested I add the follower gadget.

votive holders by babbittdesigns

I guess it's what you do when you blog.
following artwork by krisblues

I think it puts me one step closer to twittering or face booking.

custom cheerleader uniform by cutiefruity

When my virtual friends outnumber my physical friends, I am going to have a "welcome to the 21st century" party - virtual, of course. Gotta figure out how to use E-vite...


hearts by zantie

"the sage" cube necklace by Rachel323

Peppermint Lip Balm Rachel323

Thursday, December 11, 2008

Sibling Rivalry - Martha Stewart Style - Part 1

My sister actually buys Martha Stewart's magazine, so she's got a leg up on me. When we were visiting over Thanksgiving, I was oohing and aahing over the many cool projects in the November 2008 issue of Martha Stewart Living. (Some projects still available at the marthastewart website which she doesn't want linked to without permission; thus no link here. The lamb may show as first published in 2006.)


When I came to the beaded monogram to decorate Christmas packages, I said, "Let's do this together tomorrow." She looked at me like I had just spoiled her big surprise, and said "No, I'm doing it." I asked her a question about the gauge of the wire, and she said "I am not telling you anything about wire gauges."


So the first monogram I made was for her. I can hardly wait to mail it.


But then again, she made this adorable lamb, using the pattern in the magazine. So I'd say she wins this round. I'll bet the next time I go over there, she hides Martha Stewart Living.


I heard that felting wool sweaters in the washing machine can really clog up your pipes unless you put them inside a pillow case first. I seriously considered not telling her this tidbit...
Not really.

I love you, Carol!

The Handmade Procrastinator's Guide to Dressing Up Girls

On Tuesday, my daughter came home with the invitation to her Christmas concert on Wednesday. No problem, it's been on the calendar for a while. I read it just for fun, and it says "dress up." Panic! Now the Christmas dress I was going to make next week (maybe) needs to get made in the morning (absolutely.)

Here is a very simple (for those of us who sew) no pattern dress up solution. Start with baggy tee shirt so you don't even have to add seam allowance when tracing for your pattern. Use narrow elastic to gather the skirt at the (high) waist so you are not adding bulk. Finish with a big ol' sash. My daughter pointed out to me after the concert that I made it upside down. "How's that?" I asked. She showed me that the fabric has a nap, so if you pet it it is supposed to feel smooth going down and I made it upside down. She's definitely hired (when she's old enough.) Lord knows, I need the help.

Tuesday, December 9, 2008

How to make a quilted scarf

Here is the "How to" for making this quilted cotton, fleece backed scarf. This will make a great gift for people, like me, who like a colorful creative look, and want to keep warm this Winter. Since fleece is water resistant, this makes it onto the practical peoples gift list as well.

This scarf is using up Amy Butler fabric scraps from tea party chairs and fleece scraps from compact travel changing pad bags.


My daughter gave it to one of her 8 year old friends at a recent birthday party, but only after putting in an order for "one just like it only in turquoise."


1. Cutting one long edge with a pinking blade, (a decorative zig-zag cut) make your base of fleece about 1/2" wider than you want the finished width. I pieced mine by cutting ends on the bias and stitching together, without overlapping edges, with a walking zig-zag stitch. That is a stitch that has 3 little stitches inside each zig or zag. If you don't have that stitch, a regular zig-zag can work too. Also, if you start with enough fleece, (I was using up scraps) then you don't have to piece it together.


2. Piece your cottons together and finish by pressing seams open and pressing edges under all around. Can you tell I like bias cuts this year? Again, I was using scraps from other projects.

Note: I made the length of the cotton 12" shorter than the fleece to allow for a 6" fringe to be cut of the fleece at the ends.


3. With wrong sides together, stitch the cotton to the fleece. Start with the long edge that is finished with the pinking blade, and stitch the folded under cotton close to that edge, then go all the way around the four sides. Again, I used the running zig-zag.

I think you can see the stitch in this photo. The reason I like that stitch is that it gives a nice flat finish to the cotton while allowing the fleece to stretch. A straight stitch can't do that, and a regular zig-zag doesn't finish as well.

4. Trim the other long edge of the fleece close to the cotton with the pinking blade. Now you have nice, soft, pinked edges.

5. Quilt the cotton to the fleece as you like. For this one, my quilting is fairly open. It looks random from the back, but from the front it is following the designs on the fabrics. Remember that the more quilting you do, the less you will be able to enjoy the water wicking properties of the fleece. Keep the quilting light if you are going to be in a wet climate.

6. Cut the uncovered ends of the fleece into fringe, as shown.


Here is a fuller view of the finished scarf, hanging on our soon to be Christmas tree, at the tree farm.

Monday, December 8, 2008

Making Ornaments with Boys


As I watched my 14 year old son tenderly place Humpty Dumpty on the Christmas tree, out of reach of his little brother and sister, I realized what an opportunity handmade ornaments represent. We made this ornament when he was 5 years old, and it is still "his precious." Now that I have a girl, it's easy for me to forget that boys can love making things too. Our family will be doing more crafting together on these dark, winter days between school and dinnertime...


To make Humpty Dumpty:


1. Empty an egg by making 1/8" holes in the top and bottom with a straight pin, and blowing through one hole, so the contents of the egg spills out of the other (into the sink)


2. Wash out the egg, by running water into it and blowing it out again.


(If you wonder whether or not this will be fun for your son, trust me, he will love it, it's gross.)


3. The pants are shiny wraping paper glued to the bottom 1/3rd of the egg, trimmed in narrow ribbon.


4. The arms and legs are 1/4" wide elastic, glued in place.


5. The hands and feet/shoes were drawn and colored on white paper, cut out and glued in place (4 of each, so you have both sides of the elastic covered.)


6. The face was drawn on the egg with a sharpie permanent marker.


There is no hanger because the egg will break if you mess with the hole too much, so we place it on the tree. If you wanted to glue a ribbon on top though, outside the hole, that would probably work too.

I know a lot of you are making things this year with felted sweaters. Here is some inspiration from FeltSewGood.


Thursday, December 4, 2008

What Google Thinks About this Blog

I know I've only done a few posts, but right now, according to Google's keyword tool, Google thinks my blog is about polymer clay. I hate to even say those words again, for fear that Google will boost my page ranking in the many popular polymer clay blogs. Well, it's a learning curve. I just want to say, this blog will be mainly about sewing because that is what I do best. You can ask my family. I sew better than I cook, way better than I clean, and better than I play soccer or mold little dogs out of polymer clay.


And to both of you who read this blog, I will continue to show and talk about other things I think you will enjoy with me. Maybe someday Google will see me as "the sewing blog formerly known as the polymer clay blog."


For your sewing pleasure...This is my wildly popular sewing pattern for a professional looking sweet coin purse. It is my first PDF format pattern. Now I also have the sunglass case and the compact travel change pad bag in PDF format as well. Any of my patterns would make a great gift for the person who sews in your life. Take that and google it. See, I am all about the sewing.


Wednesday, December 3, 2008

Great Finds

Check out the new blogs linked to in my side bar. Modish has a plethora of fun DIY tutorials published today, and ScoutieGirl has been a favorite of mine for a while. Megan at PennyCarnival has a new blog too: DwellWellNW. I love bloggers who are also professional journalists. They make my butt bigger though...


I love this stained glass piece from GloriousGlassGarden. I mean I really want it because I have a use for it, it's beautiful, and there is no way I could ever do it myself.


The owl reminds me of a girl named Anna. So cute and so smart!

Tuesday, November 25, 2008

Easy How To Tuxedo Ruffle Tee Shirt


Don't tell Gabrielle. This is going to be one of her Christmas presents. It looks great with the turquoise velour pants and jacket that I got to coordinate.


Step one: Plan - I wanted the central row of ruffles to be 7" long, then a 6" row on either side, and then a 5" row on either side of those.

Step two: Cut bias strips. I made the strips 1.25" wide. The length of each strip is 2 times what you need the finished length to be.


Step three: Draw a line down the center of each strip.


Step four: Finish the edges of the strips. I just zig-zagged them.


Step five: Stitch 1/4" wide elastic to the wrong side of fabric, down the center of each strip. I used my new elastic foot that I got from http://www.creativesewingsolutions.com/ at Hancock for 1/2 off. Here is where you will use that line you drew to make sure the elastic goes down the center of the strips and doesn't stray. Keep the elastic stretched both in front of and behind the needle. Stretch it out as far as it will stretch as you zig-zag the length of your strips.

I am no good at getting even gathers unless I use elastic. This is what I use to gather skirts for tea party chairs too.

Step six: Pin in place on tee shirt. The edge of one ruffle will come right to the edge of elastic on the next row. This way you have fullness that you can fluff out after stitching them in place.

To stitch these in place, I am using small buttons and stitching one through the center of the ruffle (which will include the elastic) about every inch. I didn't have time to finish today because the kids have early dismissal at school, and I have to hide it now.

Love to see tuxedo ruffles popping up all over the place. That's one thing I missed all during the '90's - ruffles! Here are some great ruffles from other independent designers.

CalicoFlamingo Little Girls Ruffled Pants

Ruffled Fleece Sweater by Rebecca's Art Closet

Jacket by idea2lifestyle